 by Skip Cohen Technology never slows down, and if you look at the creative tools at your fingertips today versus just a few years ago, the line between still photographers and videographers is completely blurred. We're all shooting video because our phones and cameras put the technique at our fingertips. But just because it's there and easy, doesn't mean you shouldn't still do your best to capture and create each story. Charley Voorhis is an award-winning filmmaker and Tamron Image Master. He's also a great guy and educator, teaching at various programs around the country. In fact, Charley and I finally met in person before one of his classes at ClickCon several years ago. I pulled three of his video tips below; each one is 20 seconds or less. Charley and Tamron wasted no time making three great points, and I'm betting many of you will appreciate these refreshers to raise the bar on your skillset. Whether it's your own family, for a client, or putting together a reel for marketing, your blog, or a special project, you might as well follow the US Army's tagline - "Be all you can be!"
0 Comments
 Images copyright Kevin A. Gilligan. All rights reserved.  Intro by Skip Cohen Before you read on - this is the longest post I've ever shared on the SCU Blog, but it's for a great reason. We're back into great weather, summer, and many of you are going to think about showing your work in local galleries, shows, and community events. Even if you just scan the title of each tip, you're bound to find something relevant to help you raise the bar on showing your work. In 2015, Kevin Gilligan did a guest post that's been one of the best we've had. Initially, I ran it in three parts. Today I'm putting all three of them into one post. And while here and there something might sound a little dated - there is no expiration date on relationship building as an artist with your target audience. There's an incredible amount of helpful advice here as Kevin shared sixteen tips on doing a solo exhibition. Even if you have no intention of doing a photography show or gallery event, there's one tip after another to help you show your work better. About Kevin: The real fun of this industry is the friendships that come from everyone's love for the craft. Ever had a friend who feels like they've been in your life pretty much forever? Well, that's Kevin A. Gilligan. We met in a phone call around 2014, and the friendship continued to grow, even though we didn't meet face to face until years later. I'm not sure there isn't anything Kevin can't photograph, but the secret ingredient is his love for the craft. He's a writer, educator, artist, and a great buddy. Click on any of his images in this post to visit his website. What I Learned From My First Solo Photography Show  by Kevin A. Gilligan
Landscape photography is one of my passions. I love the feeling of capturing a great scene, especially if I get to explore somewhere new while doing it. Photographers love to share their best images. We want others to enjoy and appreciate them, and hopefully, buy them. In the past five years, I’ve shown my landscape and travel photography in a half-dozen group shows, and two museums. Last year I began to feel it was time to have a solo exhibit. I’m a self-taught photographer, and I was not planning to wait around for a gallery to offer me a show. I made up my mind that I was going to create my show. Over the course of six months, I planned and executed every detail of a solo show. Deciding to do a solo exhibit is a large commitment of time, resources, and ego. Yep, ego, you are putting yourself out there, and saying come look at my work. You have to have the confidence to show it, and a thick skin for those who won’t like it. Photography is art; you won’t please everyone, nor should you try to. The opening night of a solo show is exhilarating and worth all the work that goes into it. I learned a ton in the process. Here are a few tips I can share for those who are committed enough to put on their first solo show. Tip #1 Try a Group Show First Group art shows are a perfect way to ease your way into showing your work. You don’t need many pieces; you can often show just one. It takes less time and less money, and there is less pressure because much of the logistical work is already done. You don’t have to book a gallery space, and often someone will hang the images for you. The theme may already be selected. The group shows help you build your network of contacts: collectors, framers, printers, public relations folks. Hand out your cards, get the cards of others, send thank you notes. Tip #2 Select Your Best Images Learning to select your best images and editing them for a show is a big first step. You must learn to be ruthless. I have over 40,000 images in my catalog. I showed 27. If you are thinking about a solo show, I am assuming you are already proficient in post-production using Lightroom/Photoshop, etc. Selecting your images for a show is much more than just processing your images. It involves selecting a group of images that go together in the show. You might have several groupings of images. For my exhibit, I had 27 images in three groups. The first were aerial images of Los Angeles. I printed those on metal. The second were black and white photographs of Rocky Mountain National Park; those were printed on paper and framed and matted. The third group included some of my favorite water-related images, and a few black and white, or dark themed landscapes that complimented the Colorado images. Tip #3 Print A Test Book Once I had a semi-final selection of images, I printed a high-quality test book. The book was about 5x7 inches, and I did not spend a lot of time on the text. The point of the book was to see how the images looked together and to have the book to take with me when I met with galleries. It was also an inspiration to me to keep going. When I was tired or frustrated, I could look at the book and remind myself of my purpose. The book was something tangible I could hold in my hands. I also showed it to a lot of potential guests for the show. Printing the book shows you are serious, and it elicits a different reaction than, “Hey, look at these pictures on my iPhone.” Everyone has pictures on their iPhone, this is different, print a book. You will look at your images differently. It pushes you to do better. Tip #4 Theme/Artist Statement You need a theme. Your exhibit will need a name. Give some thought to what will describe your show to guests. This was hard for me, really hard. It took me a while. I read photography books, listened to podcasts, talked to my wife about it. I won’t lie, this took me months. Finally, I figured out something that worked for the collection of images I had in mind. ELEMENTS: SEA – AIR – LAND. Was it the best name ever, probably not, but it told the viewer what to expect, images of the sea, air, and land. As I got closer to the exhibit I wrote an artist statement incorporating the theme, and what I wanted to convey with this collection of images. Personally, I think this is an indispensable step to solidify your thoughts and connect with potential collectors. The theme was done early in the process; the artist statement came much later. Tip #5 Find a Place to Show Your Images Obviously, this is very important. You might even want to determine this first. Many decisions spring from this decision. You need to know what this space will look like so you will know how much space you have for images. How many can you show? How will you present them? The location is also an important consideration for your audience. How far will they travel to see you work? When the venue is available will affect how much time you have to prepare everything. If the location is a gallery or museum, it will likely have a lot of lighting, and it will be flexible to highlight best your art. If the location is not a gallery, you may need supplemental lighting. How much will the location cost to rent? Will you pay a flat fee or a percentage of your sales? Do they allow food and alcohol? Will they do marketing for you or will you be expected to do all of your marketing? Do they have a mailing list to promote you? Finding the right space took months for me. I had been paying attention to the galleries during my group shows. I was ready to book one gallery and it closed. I was disappointed, and had to start my search over. I contacted real estate agents about vacant spaces, but that never panned out. The real estate agents always wanted too much money for a short exhibit, and they also wanted me to get insurance and pay for electrical hookups and the like. The logistics didn’t work out. Ultimately I found a local gallery and was able to pay them a flat fee. They had lots of lighting, and they even helped me hang my images, which was great. I also found a very supportive group of artists who were interesting and fun. Tip #6 Seek Show Sponsors Putting on a show is expensive. Printing, framing, gallery space, public relations, food and beverages, a catalog….they all cost money. It’s thousands of dollars any way you cut it. Seek sponsors to help you reduce your costs, and give your sponsors billing on your public relations, social media, and gallery space. Hopefully, you have been building your connections as you have exhibited in group shows to this point. Sponsors can also include local food and beverage companies who may be new and want to expand their client base. I was grateful to have Tamron USA, Pelican Products and a local brewery and chocolatier as my sponsors. You don’t have to provide a full dinner, but some wine and cheese, or beer and chocolate is in order. I did not drink during the show so I could stay sharp and attend to my guests. Tip #7 Create a Show Flier Once you selected the show name, images, location, and dates, it is time for a show “flier.” My flier had a key image for the show that would be on all the advertising, dates and times, and names of my sponsors, my website, and email address. I printed several hundred 4x6 postcards and carried them with me all the time. I handed out hundreds of these over the course of 3-4 months and left them at key places like my local photography shop. Tip #8 Social Media As soon as you book the date of your show, send out a “SAVE THE DATE” on social media. Use the show flier on social media. Send it out to all your outlets: Facebook, Twitter, Google+, Instagram, your mailing list. Your sponsors will appreciate it. Vary the message, talk about the process, show the location, your printing, and framing. Don’t overwhelm but give periodic updates. Ask your friends and sponsors to help spread the word. Post images of the show itself, friends having fun, and perhaps even images you sell. Be sure to reach out to people individually before and after the show. Take the time to demonstrate that you are looking forward to people coming to the show, and say thanks to those who do come. Tip #9 Be Humble and Ask For Help You are going to need help, probably a lot of it. So be humble and ask for help. I’ve always been a believer in shopping locally. I buy a lot of my camera equipment from local camera stores. Yes, it costs me a bit more in the short run, but in the long-run the help with equipment and questions is invaluable. Plus I like to support my local community. For this show, I spent quite a bit of time working with an extremely talented photographer and printer from my local camera store. She helped me with paper selection, printing and gave me many helpful suggestions. One of the best suggestions she gave me was to create a replica model of the show space. Tip #10 Create a Replica of Your Exhibit Space Grab a legal pad, a few pens, and a tape measure and go visit your exhibit space. Measure the dimensions of ALL the walls and draw a diagram while you are there. Next create a model of the space out of foam board. Make every foot equal to one inch and be sure the model is to scale. Height of the walls and distances included. Write the height and width on each wall. Connect the foam board pieces using clamps and/or nails. You will want to be able to take the walls apart and put them back together again. You are going to print super-small copies of your pictures and post them to the walls using pin cushions. By doing this, you will be able to see which images go together on a wall, which images should be vertical or horizontal. You are going to measure out the distances exactly. Did this take a lot of time….yes. Did I get frustrated doing this….yes. Was I delighted when I got to the gallery, and I knew exactly where each piece was going to go……? Absolutely. It cut down on a lot of stress on the day of installation. Tip #11 Test Prints This will be obvious to some, but test prints are critical. You need to know how your image will look on the particular medium that you are using. Half of my images were printed on metal for this show. I ordered several metal prints (dye fused on metal) from several print labs before the show. I experimented with several different finishes on the metal as well i.e. glossy, matte, etc. The paper prints were even more complicated. Each paper has a different print quality, price and displays the ink differently. “HELP”….my head was spinning. I spent many hours working with a printer to get each shot right. Finding the right framer, at the right price, can also be challenging. Your network can be invaluable here. Tip #12 Installation/Hanging Your Images Hanging images can be very challenging. Honestly, I hate doing it. Give yourself enough time. At least a day. If you have done your model (tip #10), then this will be much easier, you already know which images go together as a group, and where specifically each will go. Ask for help, bring a friend who has done this already if you can. Keep in mind that some galleries will hang images with wires and some galleries only want “D” rings. You should ask the gallery how they want the images before you frame them, assuming the gallery is going to help you hang the images. Tip #13 Create a Catalog Create a catalog of your work for the show. Include your artist statement, pictures of the images, the size of the images, the medium, and the price. I made 250 copies of the catalog, and it was well worth it. Hand it out at the show and let people take it home. This will help with your follow-up sales. Tip #14 Sign-In Book Purchase a nice leather bound book for the show and have people sign in and provide their name and email address so you can thank them for coming and invite them to future events. Tip #15 Follow-Up Follow up with your prospective purchasers after the show. Thank those who came to the show and especially those who purchased an image. Tip #16 Hire a Photographer Hire a photographer for the day, so you get images (with you in them for a change) and you can relax. You’ll be happy to have the images of your friends and for use in future marketing and social media efforts. Conclusion: Having a solo exhibition is a landmark in your professional photography career. It says you are serious about your photography and willing to put in much more time and effort than the average photographer. Give yourself lots of time, six-nine months and enjoy the learning process. Nearly 250 people attended my exhibit, I sold a third of my images during the show, and even more after the show. I met collectors and I'm building my mailing list. It was an exhilarating and somewhat exhausting experience. I couldn’t be happier I did it. I hope you do it too. 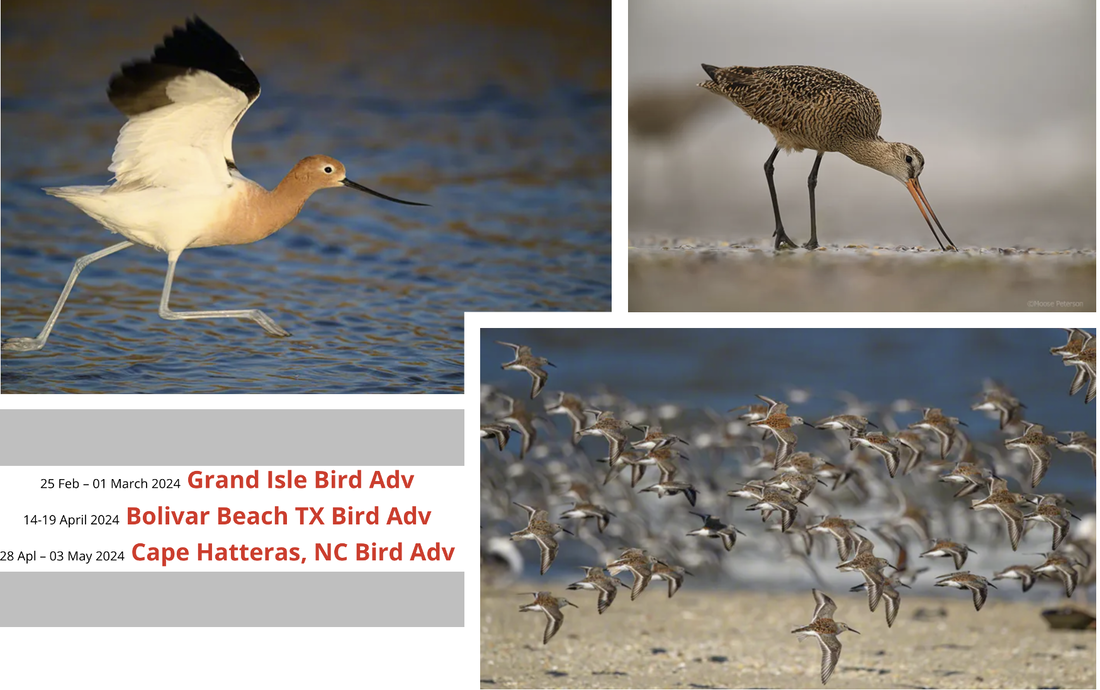 by Skip Cohen
We've all been to various kinds of workshops over the years, some great, others average, and then there are those programs that could put a rock to sleep. Here are three coming up in 2024 that will fill up fast, but it's all because they're great programs. So, what makes a great program, and why would I suggest you put these on the very top of your bucket list?
Last but not least - a photographic adventure with Moose will always be fun. "FUN" - that's one of those words too often lost today. It's buried underneath the stress of business. These programs will fill up fast. If you're interested, click on the banner above for more information and get yourself signed up.  Click any image above to check out the Kickstarter page  by Skip Cohen Yes, this is an infomercial, but if you know my reputation, it's not without being justified. I've been involved in several Kickstarter campaigns since joining Platypod, and this one has been the biggest kick to work on. Why? Because the product has a huge payback in boosting creativity, and it's just $49 until the end of May. While it looks like a light-saber handle with the description of a camera riser - it may well be one of the most diverse accessories the company has ever released. And for those concerned about backing projects before they go to market - this one is in full production, with our first shipments already headed from overseas to our warehouse! So from studio to close-up, macro, food, portraiture, tabletop and copy stand work, even vlogging, this little marvel allows you to add up to eight different accessories. With eight 1/4-20 sockets at the top, you can add lights, reflectors, monitors, and the list goes on and on. Plus, it will hold up to eleven pounds, and they're stackable - each from a breakdown height of three inches to adjust from 6 to 10 1/2 inches! Visit Kickstarter and scroll down the project page for great videos and reviews from Lenworth Johnson, Rick Sammon, Don Komarechka, Stewart Wood, Moose Peterson, Dave Williams, Liam Douglas, Bob Coates, and Sharky James. What a kick! Check out Larry Becker's demonstration video below...there's so much this accessory can do. "Do you really need this?" For most of you, YES!  Image copyright Bob Coates. All rights reserved. by Skip Cohen Circle the Date: April 5th at 11AM PST and 2PM EST There are a lot of great online programs these days, but nothing beats two remarkable artists joining forces for an outstanding event. Bob Coates and UK photographer Gavin Phillips are teaching together! Bob Coates will be teaming up with UK photographer Gavin Phillips to share a webinar on artistic Photoshop Actions that Gavin has designed for creating watercolors and paintings from your photographs. When you sign up for the webinar you’ll get two backgrounds as a bonus. If you can’t make the live event you’ll be able to view the recorded version. Learn more and click here to sign up.  Images copyright Gavin Phillips. All rights reserved. 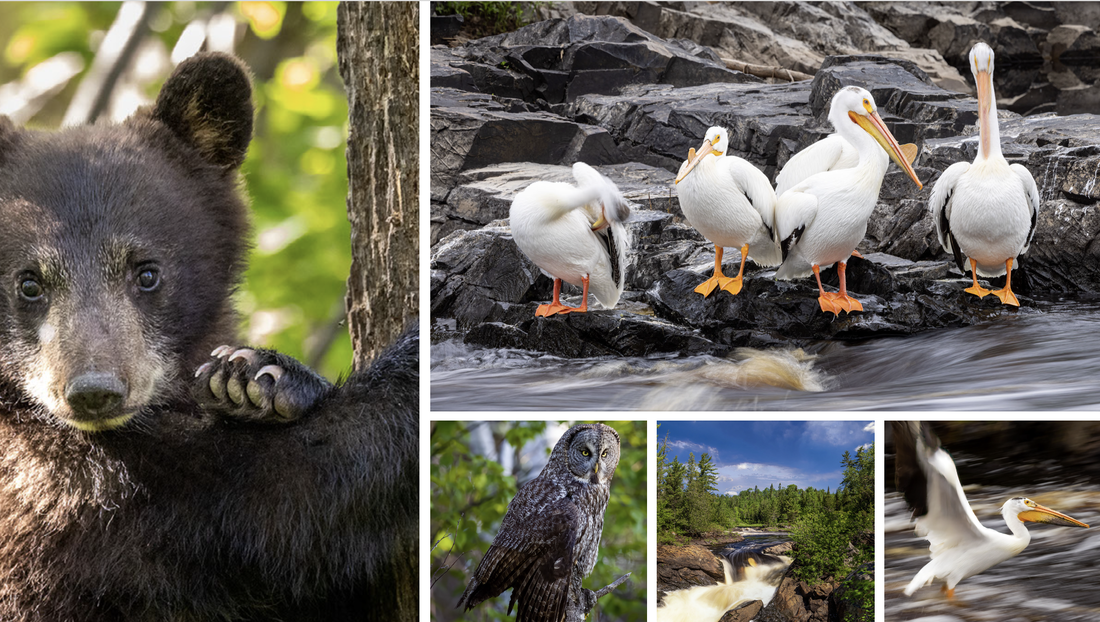 Images in this post, copyright Bob Davis. All rights reserved. 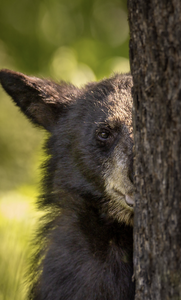 by Skip Cohen It's so easy to get caught up in the day-in-day-out challenges of life and business. Along the way, we forget our bucket list for adventures. Here are two outstanding trips coming up in Minnesota and Kenya. What I love most about these two trips, besides the subject matter, is they involve two of my favorite people in the industry - Bob and Dawn Davis. We've been friends for a long time, but the friendship came out of the respect I have for their skill set as artists and business owners. Here's an opportunity for you to shoot with one of the finest photographers in the industry. BLACK BEARS, WHITE AMERICAN PELICANS, WATERFALLS, + LANDSCAPES WORKSHOP WITH BOB DAVIS It all starts out on June 7 in the Northwoods of Minnesota. Limited to just eight participants, the description of the bear part of the adventure says it all! Get ready for an extraordinary adventure! This workshop offers an incredible opportunity for a thrilling in-field photographic experience that you won't want to miss. In June, we'll be focusing on capturing the antics of some of the most adorable creatures on the planet... the bear cubs. These little fur balls are brimming with energy, curiosity, and playfulness, making them a delight to photograph for amateur photographers as well as the most accomplished wildlife photographers. With so many bears present, this is the perfect time to capture all kinds of captivating interactions and portraits, including cubs of all sizes. It's an experience that's sure to fill you with wonder and excitement! More information is just a click away on any of the images above! JOIN BOB + DAWN DAVIS ON A PURPOSE-DRIVEN PHOTOGRAPHIC SAFARI KENYA, AFRICA 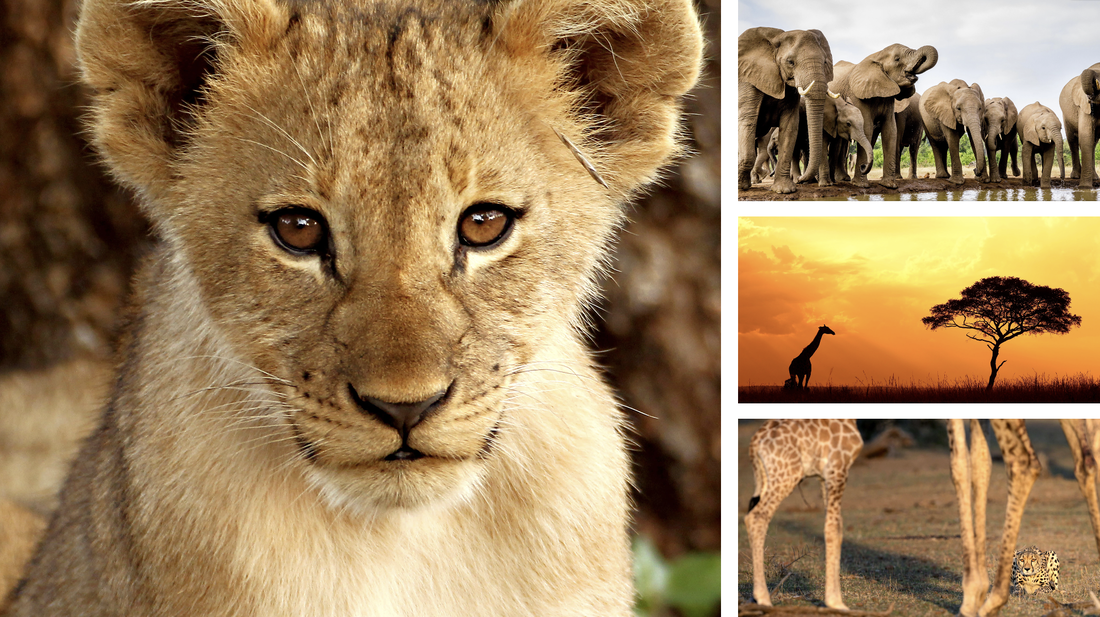 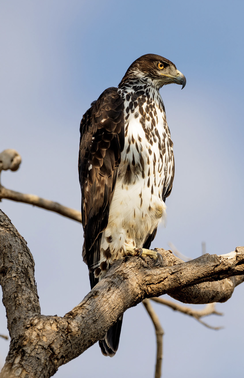 Here's another trip that should be at the top of your bucket list. Again the description says it all: We're excited to invite you to join us, Bob and Dawn Davis, for a once-in-a-lifetime Kenyan adventure! This trip is all about immersing yourself in photography, storytelling, and exploration of unique experiences. For 10 days, we'll be focusing on wildlife, travel, and landscape photography while exploring the Amboseli, Tsavo, and Maasai Mara Game Reserve in Kenya. You won't find a higher concentration of big game anywhere else, including wild lions, leopards, rhinos, cheetahs, hippos, and elephants - and that's just the start! If you've met Bob and Dawn, then you already know they never do anything halfway. This adventure is a massive memory-maker. Plus, it's combined with plenty to photograph, the commradiere that comes with small groups and the educational level of working with two of the industry's most passionate members! Click on the banner above to link to the website for more information. And if you're on the fence, take the time to call Bob and Dawn directly with questions. Neither of these trips will be available for very long. Contact Bob at 312-719-3577 or email [email protected].  Images copyright Dave DeBaeremaeker - click on any image to visit Dave's website and check out the original images. by Skip Cohen As I've written so many times before, the fun of this industry is in the friendships that come from everyone's love for the craft. Meet Dave DeBaremaeker. Although we had talked on the phone a few times over the last couple of years, we finally met in person a few months back when he joined me on Scott Kelby's show, The Grid. It was a kick! Dave's passion for photography is all about toys, but as I watched this recent video on his YouTube channel, I realized how many of his applications work in other specialties. From rings and detail shots at weddings to closeups and macro images of flowers at home through the winter months - the common denominator is the gear behind the scene. Obviously, wearing the hat of CMO for Platypod, I love this video, but it goes beyond toys. So many of you have a diverse collection of demands on your skill set. You need to be prepared for different challenges, and Platypod is often about solutions and gaining a new perspective. Click on any Platypod Pro below to check out the rest of the "family." There's an incredible variety of images being captured with Platypod as part of the gear to get the shot! And you'll notice Dave is in the third row down in the photos below. The "family" on our website includes forty-four artists shooting virtually everything from macro to landscape to toys, food, portraits, real estate, night skies, and the list goes on and on. Dave needs to be on your radar. You'll find more of his work on his website and check out his YouTube page too!    by Skip Cohen Michele Celentano and her husband, Paul, were here in early December. We haven't all been together since before the pandemic, but that didn't stop the laughs. We've been friends for a lot of years, and with great friends, even a one-night stay-over is time to cherish. So, what happens when one of the industry's finest family photographers falls in love with your dogs? First, she threatens to steal them! When Michele wanted to photograph our girls, I figured a couple of grab shots, not a complete series. But the fun of it all was watching her work with the puppies. There's are reasons she's one of the best - her love for the craft and her ability to communicate with her subjects, whether they've got two legs or four. For all of you younger artists, there's a lesson here. Michele's skill set is extensive. While she's not a pet photographer, she understands every aspect of composition and lighting. Moreover, she's never stopped learning and fine-tuning her skill set. Lucy and Belle responded to the love they were being shown, the same as Michele's clients. When you wander through her galleries and look at her work, you can tell from the natural expressions of her subjects. It's a story of trust in the photographer combined with fun during the sitting. Here's my point: As photographers, you've got an enormous responsibility to consistently deliver the best to your clients. They're trusting you to exceed their expectations. And when that happens you become habit-forming. If you're at a convention and Michele is speaking or doing a demo on the trade show floor, run, don't walk to get a seat. She never disappoints and never compromises on the quality of what she delivers! Click on any of the images in today's post to link to her Facebook page, and then put her on your radar!  In the hierarchy of why consumers hire a professional photographer, it goes to brides, babies, and pets. That's the top three from a Kodak study at least twenty-five years ago, and I don't believe it's moved a bit. The pandemic changed the ranking slightly, but not the top three. Now, add to that the incredible growth in households with pets worldwide! Take it a step further and look at the size of the pet industry. I took a quick stroll through cyberspace, and PetKeen.com had one the most thorough sets of statistics. Click on the banner below to link to the complete article. It's the top line you need to appreciate - the global market for pets is worth $261 billion, and pet owners in the US are spending over $100 billion on the furry members of the household. But one more statistic made me smile: Americans spent an estimated $490 million on Halloween costumes for their pets! Here's the bottom line - pet photography can be an incredibly lucrative business, but don't underestimate the need for a great skill set. The standards for a great portrait and the experience of a fun sitting don't change just because the subject's got four legs! 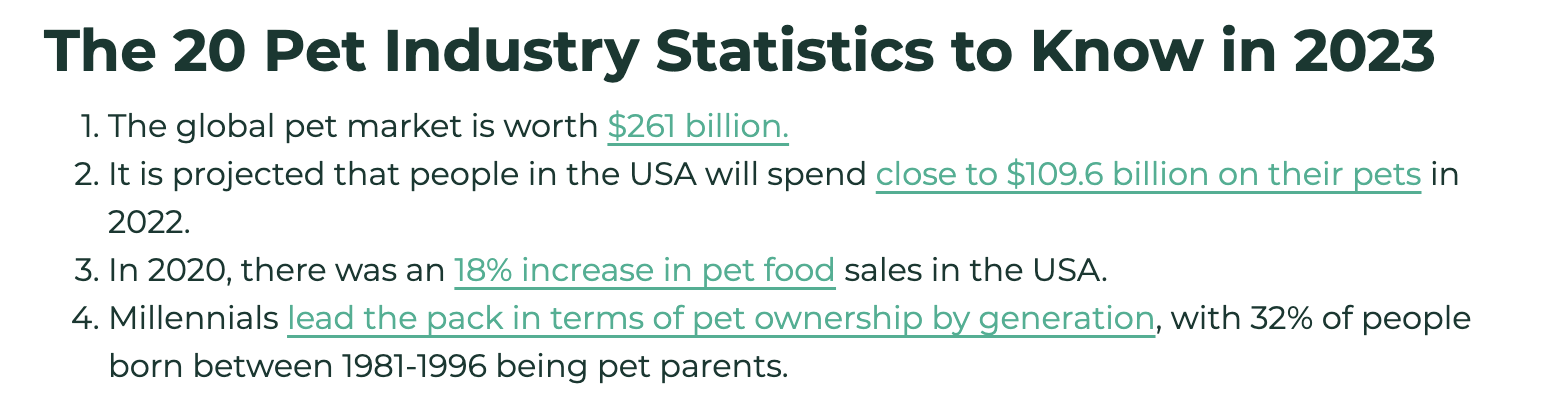 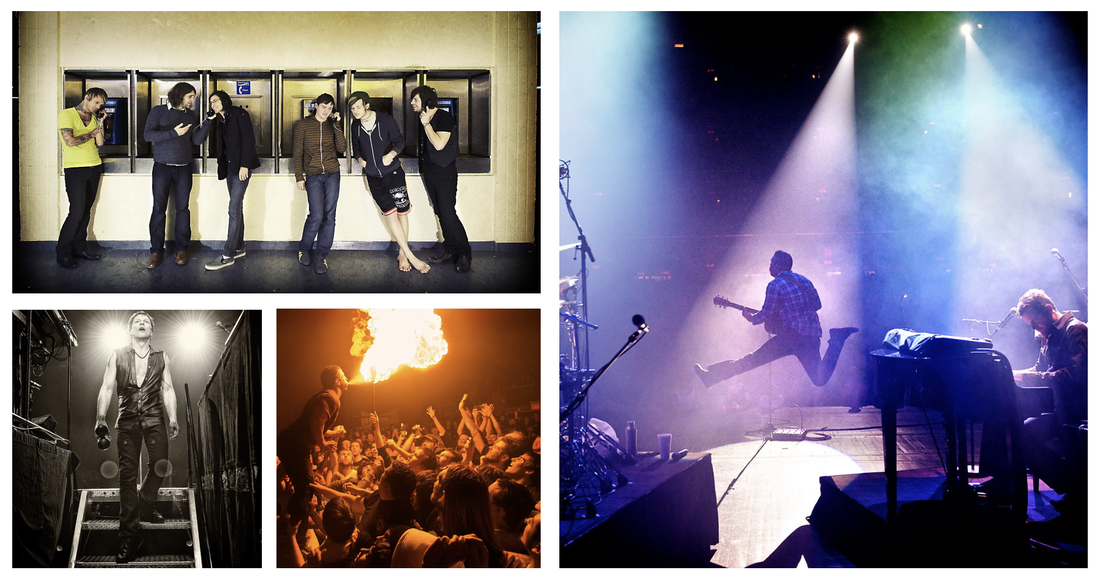 All images copyright David Bergman. All rights reserved.  Click to watch the David Bergman episode Click to watch the David Bergman episode by Skip Cohen The new year is off to an outstanding start for education and expanding your skill set. Last week, David Bergman announced his "Shoot from the Pit" program is back for 2023 at stadium concerts. Here's an opportunity to learn concert photography with one of the best in the industry right from the pit at live shows! David has an outstanding track record as an award-winning artist, educator, Canon Explorer of Light, author, and good buddy to so many photographers in the industry. I've included his short video on the workshop series, as well as David's November guest appearance on Steve Brazill's behindtheshot.TV. It's the perfect introduction to understanding the depth of not only David's expertise but his passion for the craft! And if you still want to see more of his work and get to know him even better, just click on any image above to link to his website! These workshops are limited to just a few attendees - they'll sell out fast. So check out the schedule with David and join him on the road with Luke Combs in 2023! by David Bergman
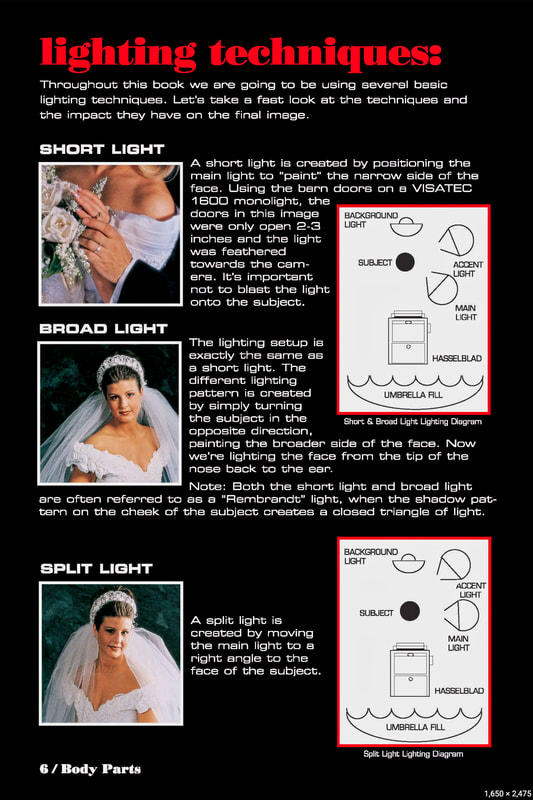
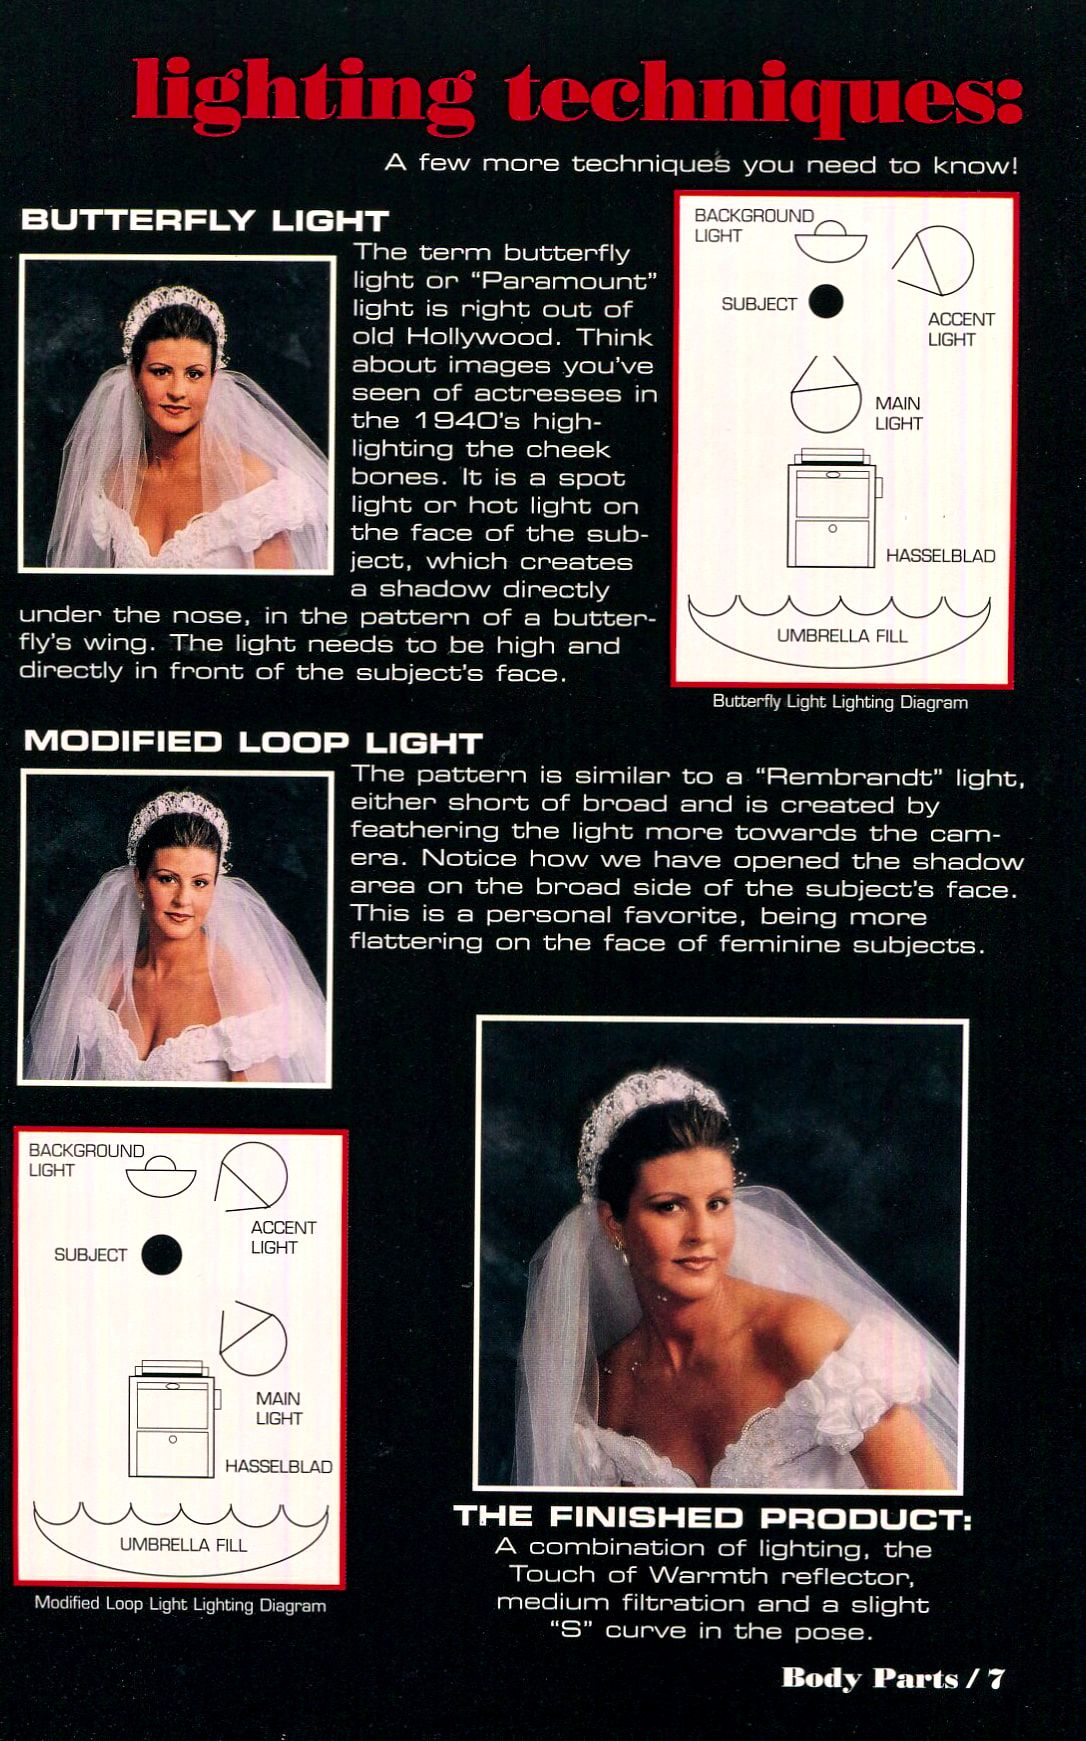
Shoot From the Pit is back for 2023 at STADIUMS! I've done nearly 100 of my live, concert photography workshops and we're continuing this year even bigger and better. I've learned more than a few things about photographing epic concerts in my 30+ years in the business, and I'll teach you as much as I can backstage at Luke Combs 2023 stadium shows in the US and Canada. Then you get to shoot the entire show that night with incredible access! It's a once-in-a-lifetime experience that you won't want to miss. All stadium workshops are on sale NOW at ShootFromThePit.com. I expect them all to sell out, so don't wait to grab your spot. * Proof of Covid vaccination is no longer required to attend the workshops. Also, future workshops (possibly in New Zealand, Australia and Europe *wink wink*) will be announced first on the email list at ShootFromThePit.com if/when they become available. Join me and let's "Shoot From the Pit!" 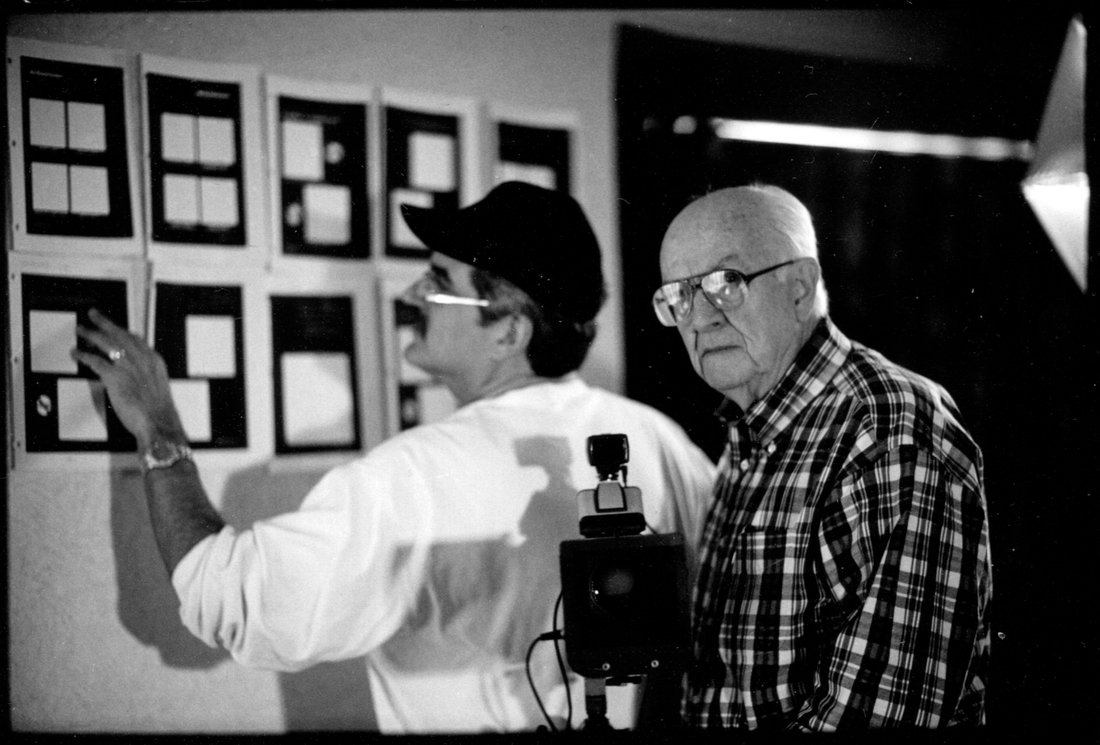 by Skip cohen Twenty-three years ago, Don Blair and I wrote a book together, Don Blair's Guide to Posing and Lighting Body Parts. Working with our good buddies, the other two Musketeers, Tony Corbell and Terry Deglau, we shot all the images for the book in Las Vegas. Of course, this was all pre-digital, so the storyboards were taped to the wall, and as we completed each page, the Polaroids were added to the illustrations. There are few projects from my career that make me smile as much as this one. It was a lot of hard work, but the four of us were the very best of friends, and the energy, the laughs, and the success of creating each page made it an incredible memory-maker - perfect for Throwback Thursday! Parts of today's posts are from the SCU archives, but there's a definite reason for sharing the two pages I chose below.
Click on either page to enlarge in the SCU Lightbox There are too many of you who know virtually nothing about lighting. You call yourself "natural light specialists," suggesting it's a talent to always go with available light. But it's so easy for you to learn more about lighting with one goal - to exceed client expectations and make yourself habit-forming, I was looking through "Life's Little Instruction Book, Volume II" and I found this piece of advice... 916. Learn the rules. Then break some. Most of you never knew Don Blair. He used to tell people, "You have to know the rules before you can break them!" His favorite "rules" were about lighting and posing. He respected the rules because they represented the primary tools he had to create flattering images of his subjects. The rules were all about his ability to exceed expectations...EVERY time. Remember, there was no Photoshop for Don...he couldn't take twenty pounds off a subject in post-production. He had to rely on his skill as an artist and get it right in camera!
I apologize for the quality of the scans; these are from an old copy of the book we did together. However, there's enough here to help you understand my point. Every image on those two pages is exactly the way they looked...right out of the can. Now, think about your work. It's holiday time, and most of you will be in a position at some time to capture a few portraits. So take the time to pay attention to your lighting, posing, exposure and composition. And going into the new year, learn everything you can do with your skill set, before post-processing. It'll not only save you time, but you'll elevate your work as an artist and be on your way to becoming habit-forming to your clients. And...when you need to break the rules, for whatever reason, you'll have the incredible satisfaction of understanding them and elevating your work to becoming one of the great portrait artists. Every artist can break the rules; the key is to know them first! Happy Throwback Thursday! 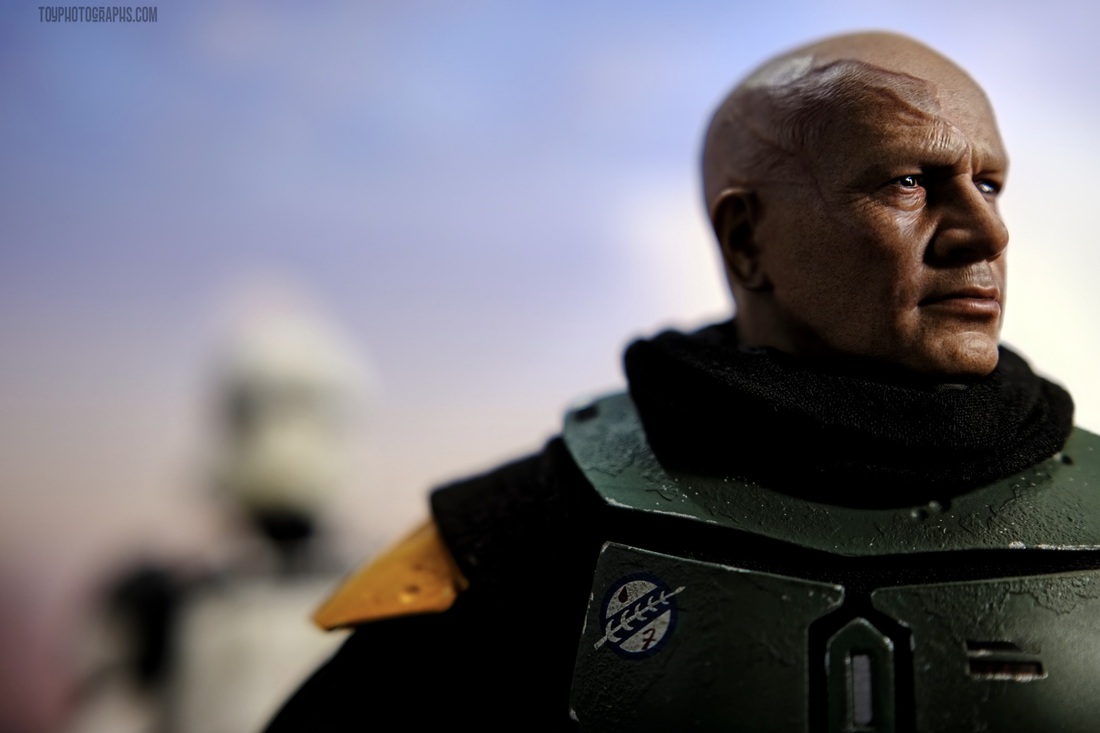 by Skip Cohen When my buddy Scott Bourne posted the image above on the new community site for Platypod Users, I was blown away because it looked so real. The information about the portrait is below, but I still wanted to call him. It was our phone conversation that prompted me to want to write this post. The star of the image is a toy, and while it was done in the studio, Scott gave credit to everything he ever learned about portrait lighting, starting with Monte Zucker. Monte's name is sadly not recognized by many young photographers. He was a master of lighting and portraiture and blazed a trail for so many of the techniques in lighting and posing today. As we talked, the depth of Scott's understanding of lighting kept going deeper with names like Clay Blackmore, Tony Corbell, Bambi Cantrell, and Matthew Jordan Smith, just to name a few. And that brings me right to my point and why I wanted to share this image in today's post. I am a part of all that I have met. Alfred Lord Tennyson wrote that quote above, but it fits perfectly with everything Scott's learned in his career through so many different specialties. From his own workshops, to attending every convention he could find time for, he's never stopped learning, regardless of what his primary business in imaging might have been at the time. He lit Boba Fett the same way he'd work with a live model in his studio to create a pensive portrait. And it doesn't matter if you're a boudoir, portrait, family, maternity, newborn, or children's photographer - understanding the craft and especially lighting will always raise the bar on the quality of your images! Interested in seeing more of Scott's work? Follow him on Vero.  by Scott Bourne
Boba Fett Pensive Portrait Sometimes you have to break the "rules." Typically I'd make a portrait where the subject looks into the empty frame. It's more comfortable and the eye likes to have a place to go. Here, I want to create tension and dissonance. Because of that I have Boba looking out of the short side of the frame. There's a tank trooper in the background. Is he friend or foe? That is for you to decide. I am merely the storyteller. My job is to get your mind churning on the possibilities. The lifelike sculpt in the Hot Toys 1:6 scale Book of Boba Fett figure is amongst the best I've seen. I can work with this guy any time I want. He's probably my favorite character to photograph. And he always does exactly what I tell him to do. This is mostly SOOC from my Fuji X100V using a Hoya +4 Closeup Filter. Photographed against a printed background from Printique.com. See the BTS photo for more info. Shot at 1/80th sec @ f/2 Remember, toys are joy. For a list of my toy photo gear and props go to: bit.ly/toyphotogear  Creativity is the ability to see relationships where none exist. Thomas Disch by Skip Cohen At the risk of sounding like a Jack Handey clip from old SNL shows, when I read the quote above, it got me thinking about how it applies to our industry. As pros and aspiring professional photographers, you're all in the business of capturing relationships.
And here's one last big one I see every day when I'm wearing my Platypod hat. Eight years ago, Larry T. had a vision of being able to travel without the bulkiness of a tripod but have the necessary gear to capture images that could never be handheld. In fact, the recent Platypod Pros feature on the website highlights forty of the most respected artists in the industry who, every day, create and capture relationships where none previously existed. So here's my point - so many of you undervalue what you bring to the party with your skills, business, and ability to help your target audience. You worry about the timing of getting more involved and reaching out. You've got the passion for the craft, and you've spent plenty of time fine-tuning your skills, but taking that jump into the public eye and building relationships is risky. Here's one more thought based on an old proverb: The best time to plant a tree is twenty years ago.
The second best time is now.   by Skip Cohen It's Tamron Tuesday, and there's so much you can learn from these short videos Tamron regularly shares. And they're all on Tamron's YouTube channel. The video below is from their archives, with professional photographer Maxim Guselnikov putting the 70-180mm F/2.8 DI III VXD, model A056, to the test. He's shooting Sony full-frame mirrorless. Remember, I'm sharing screen grabs from a video. So, imagine how sharp the original images must be. In addition to simply watching another artist work, each still image in the video includes the exposure triad and focal length. Maxim's shooting in the studio, outdoors, in the theater, and truly putting this lens through a great little test drive. Tamron's manufacturing some of the finest glass in imaging today. But don't take my word for it - visit your local Tamron dealer yourself! And check out their ongoing workshops and programs taking place all around the country. The 70-180mm F/2.8 DI III VXD, model A056 lens is part of Tamron's current "Fall Savings" program, but only until October 30! Click on the banner below for more information and to find the Tamron dealer nearest you. 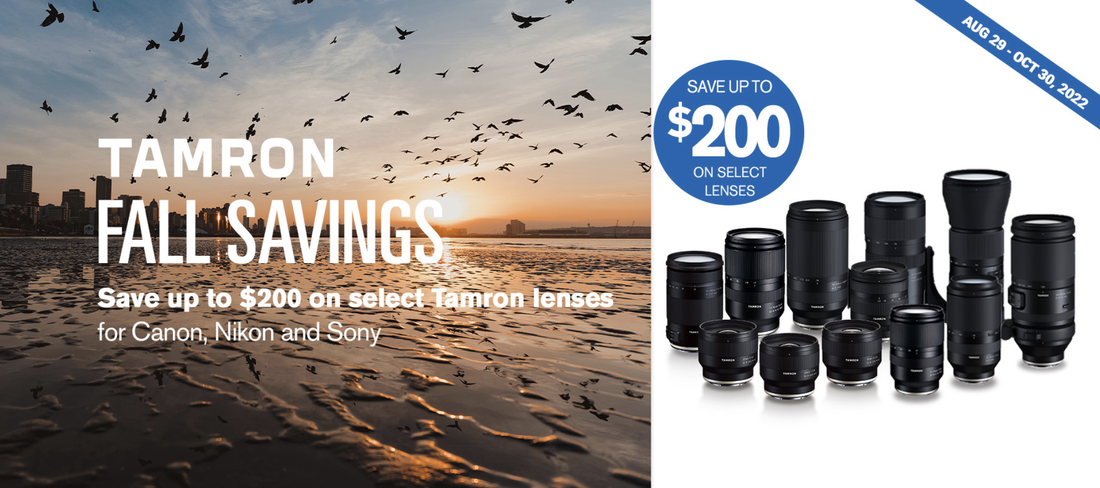 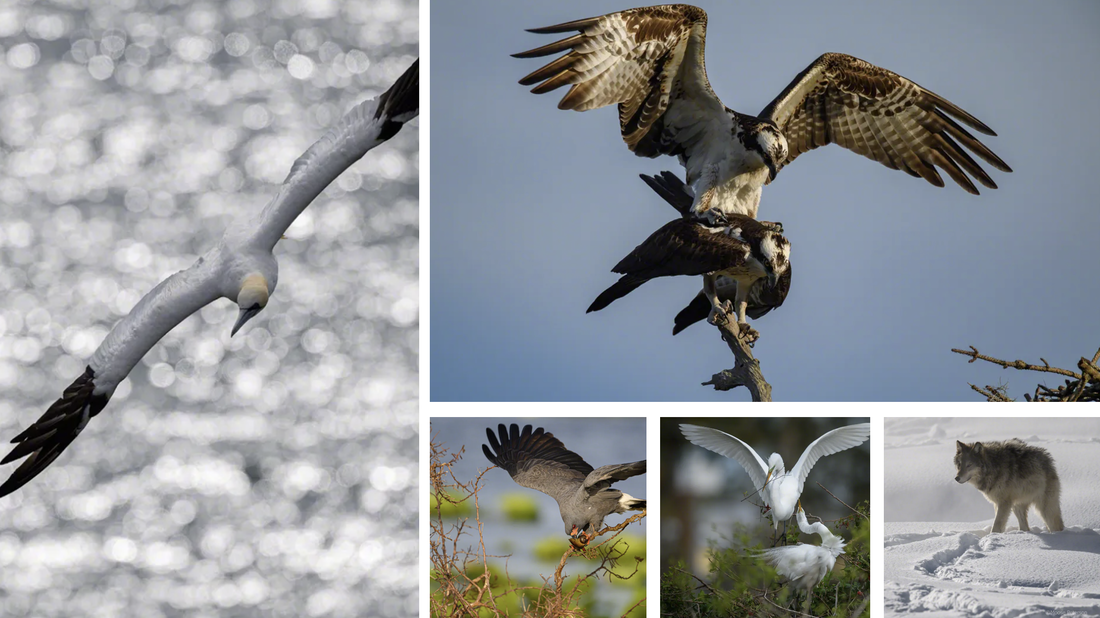 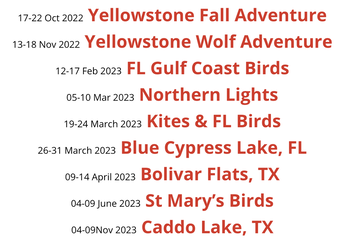 Click any trip above to review the entire schedule to date Click any trip above to review the entire schedule to date by Skip Cohen
Now and then, opportunities come along that simply shouldn't be missed, especially with Moose Peterson. For the next year, Moose has some outstanding workshops coming up - all with small groups, limited attendance, and incredible subjects. From Yellowstone to Texas to Florida and then some, he's going to be teaching - and it doesn't get any better than hands-on with Moose by your side. Living in Osprey, Florida, which, has an abundance of Ospreys to watch, I love that he's going to focus on these magnificent birds at Blue Cypress Lake...and there's only room for 4-5 shooters! Here's the link, but don't wait too long - this one, like his other workshops, will sell out fast. Remember, these are all small groups, which gives you time to get to know Moose, boost your skills and develop the kind of camaraderie that lasts a lifetime. Regardless of your specialty, Moose should be on your radar, especially his blog - you'll never be disappointed. What a kick! 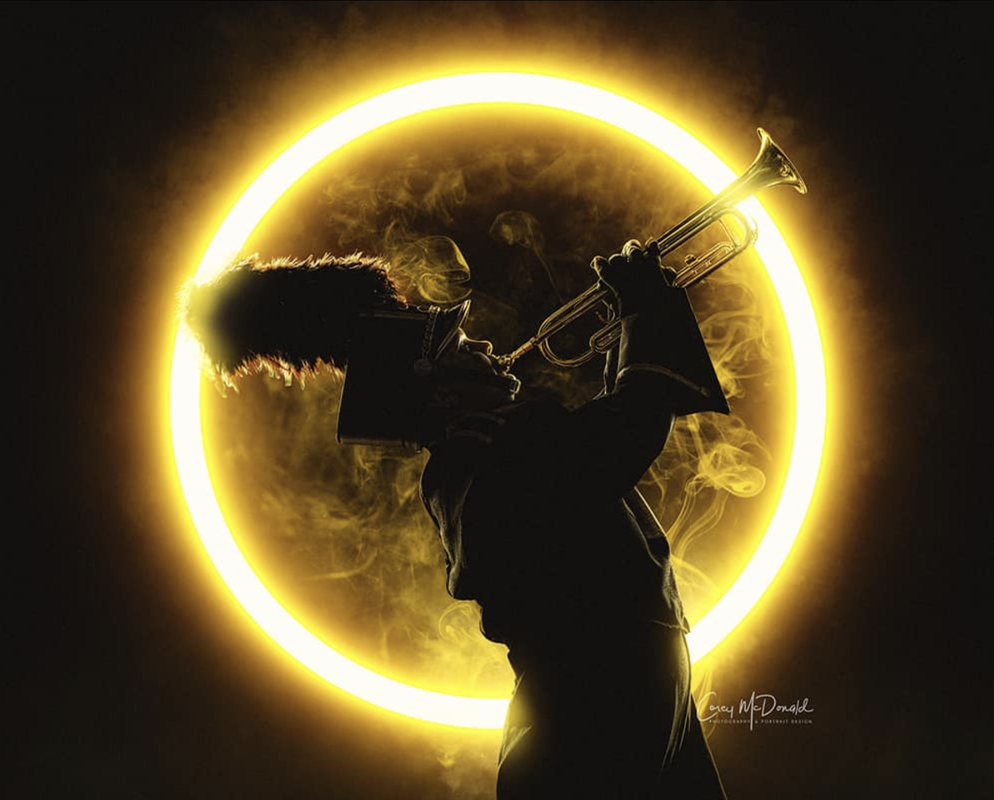 Images copyright Corey McDonald. All rights reserved. 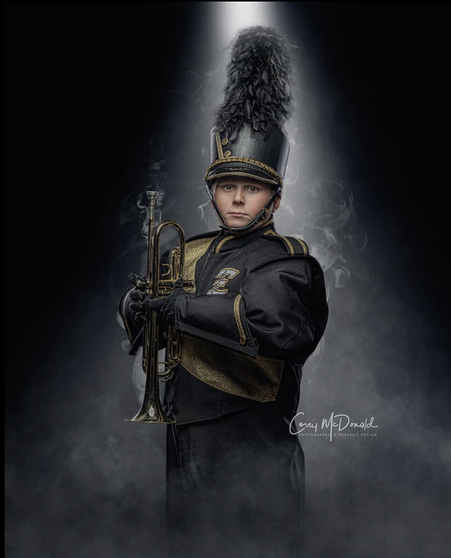 by Skip Cohen There's so much you can learn simply by taking a scroll through the notifications that come up on your Facebook page. It's time to meet Corey McDonald. The image above pulled me into the photographs he shared, but the other two were just as remarkable. I know it was a long time ago, but I was a band nerd, playing the French horn for many years. Back then, nobody did senior portraits the way they do today - everybody got the same shot - guys in jacket and tie, girls in a v-neck black shroud. There was simply no personality shared in any portrait. I would have killed for a portrait like this of me. And here's my point: you have so much power with every portrait you capture. Boudoir photographers often talk about the power of increased self-esteem a portrait session can create. Senior photographers talk about how they feel knowing they've captured the essence of their subject, especially when they've done a sitting involving their personal interests, usually cars, motorcycles, sports, and animals. Today's post is about the power of a remarkable portrait of a kid in the band! But it's also about Corey's goal to give each kid his very best. Remember, for a lot of seniors; it's their first interaction with a professional photographer. Do it right and build the relationship, and you'll have a kid like this as a client for the rest of his life! And to Corey, who I cold-called for permission to share these images posted in Gary Box's Facebook Forum - nicely done. Thanks for allowing me to share three portraits that deserve to be seen by more people. You can check out more of Corey's work with a visit to his website. It's just a click away. 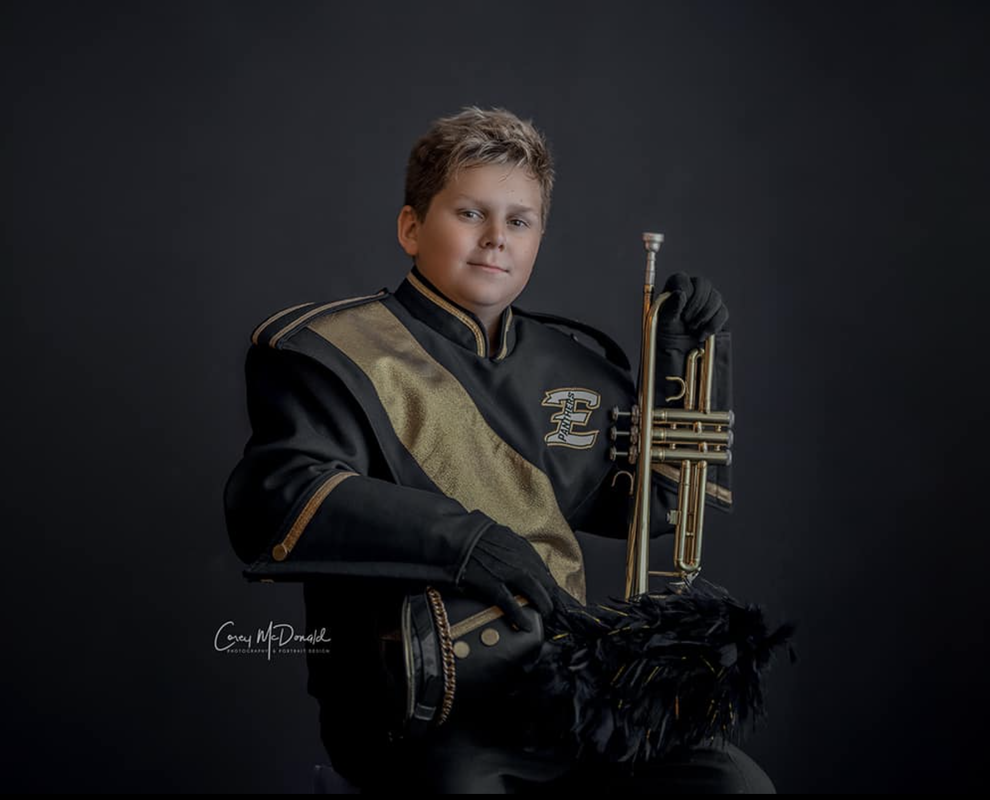   Captured by Lisa Langell by Skip Cohen Whether you're an outdoor/wildlife artist or not, there's a lot to learn from Tamron's videos. To start, they're making some of the finest glass in imaging, and their new 50-400 is pretty outstanding - a "next-level ultra-telephoto zoom." But technology is only part of the story. When you visit the product page, Tamron's sharing images from well-respected photographers to help demonstrate the versatility of the lens. I grabbed three of my favorites to share in today's post. I also like how they share the exposure triad, the focal length, and the gear used. They're not just announcing a new lens but adding an educational element about the image itself. Now take things a step further and pay attention to how they tell the story of the new lens in the one-minute video below. Forget that it's a lens and take the same storyboard and apply it to how you might tell your own story in a marketing video about who you are and the services you offer. Regardless of what you shoot with, check out Tamron's YouTube page - it's loaded with great videos and elements to help you raise the bar on your skill set. There are 390 videos currently in the collection, with almost 26,000 subscribers...and it's just a click away.   Captured by Takahiro Bessho   Captured by Masaki Kadono
 Intro by Skip Cohen Over the last few weeks I've shared a number of Seth Resnick's posts. He always manages to get me thinking about something related to imaging, and today's guest post is a perfect example. Posted last week, he talked about Dall-E. Over a million people signed up, just to try it out. A big thanks to Seth for allowing me to share his thoughts here on the SCU blog. If you don't already follow him on Facebook, he needs to be on your radar. And if you'd like to share your thoughts about this specific post, scroll down his FB page to August 4 and comment. 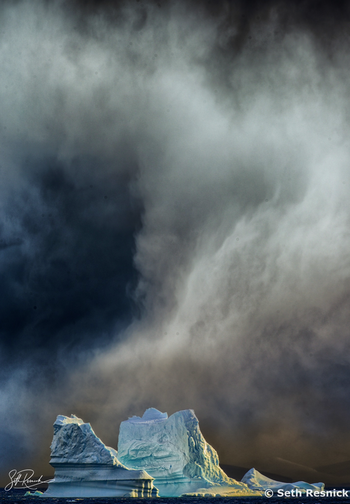 by Seth Resnick
Yesterday Dall-E became available and there were over 1,000,000 people who signed up to try it. I was not one of them. So for those who don’t yet know, Dall-E is an AI application that can ingest both language and text and create a single image from the stream. I am a big fan of technology and the technology behind this is incredible. That said it also raises a stream of questions including the very concept of removing the very experience of photographing. The idea of creating an image by writing a text stream is indeed fascinating but at the same time quite scary. There are an incredible amount of questions and problems I foresee with this type of software that go way beyond the issues of social media. What will happen with violence, racial, sexual or gender issues? Is this the final death to stock images? In fact is this a death to assignment photography? AI is programmed by humans so how this reacts will be in part based on the programming. It also immediately raises a giant question. Who would own the copyright? One could easily argue that it would be the artist but one could easily argue that it would always be the software company. While I always welcome new technology, I look at the image chosen today and would never want to give up the experience of being in this sacred place and experiencing this first hand. Thoughts ?  by Skip Cohen
As I've written so many times before, the fun of this industry is in the friendships. Well, meet Erik Cooper. Erik and I met when I was wearing my Platypod hat. He was a new member of PPA, and at the time, there was a new-member benefit to receive a Platypod. What started as a purely customer service phone conversation has grown into a great friendship, multiple calls, and finally catching up to each other LIVE at ClickCon last year. Erik is a fashion and portrait photographer, although I doubt there's anything he can't photograph. He's based in Colorado Springs. We're a perfect example of how Facebook is sometimes the mortar that holds so many friendships together, especially during a time of limited conventions and travel - combine social media with a phone and it's easy to stay in touch. Meanwhile, today's post isn't about Erik but the importance of understanding great lighting. Whenever I hear an artist say, "I'm a natural light specialist," right from the start, I know they're afraid of studio lighting. They've never taken the time to learn lighting and expand their skill set. The truth is, all of us love natural light, and that's what understanding studio lighting is all about - creating stunning photographs with whatever light source you have! But there's another point to today's post - a reminder of the power of a black and white image, especially in portrait work. Bringing a few black and white images into your portfolio/galleries also shows diversity in your skill set. Learn to see in B&W. It's about your thought process from the beginning and learning to see the highlights and shadows in your mind as you create and capture the portrait. And for on-location wedding and event photographers, B&W also gives you more creativity in tough situations. For example, one of the early books I co-authored was with Bambi Cantrell. In the book she talked about shooting B&W when you're photographing in "the First Church of Uglyville!" We even did a stunning bridal portrait in the restroom at a hotel. It was shot in B&W, and was stunning, hiding the ugly deep pink tile walls! A big thanks to Erik for sharing these images with me, and if you'd like to see more of his work, his Instagram page is just a click away. 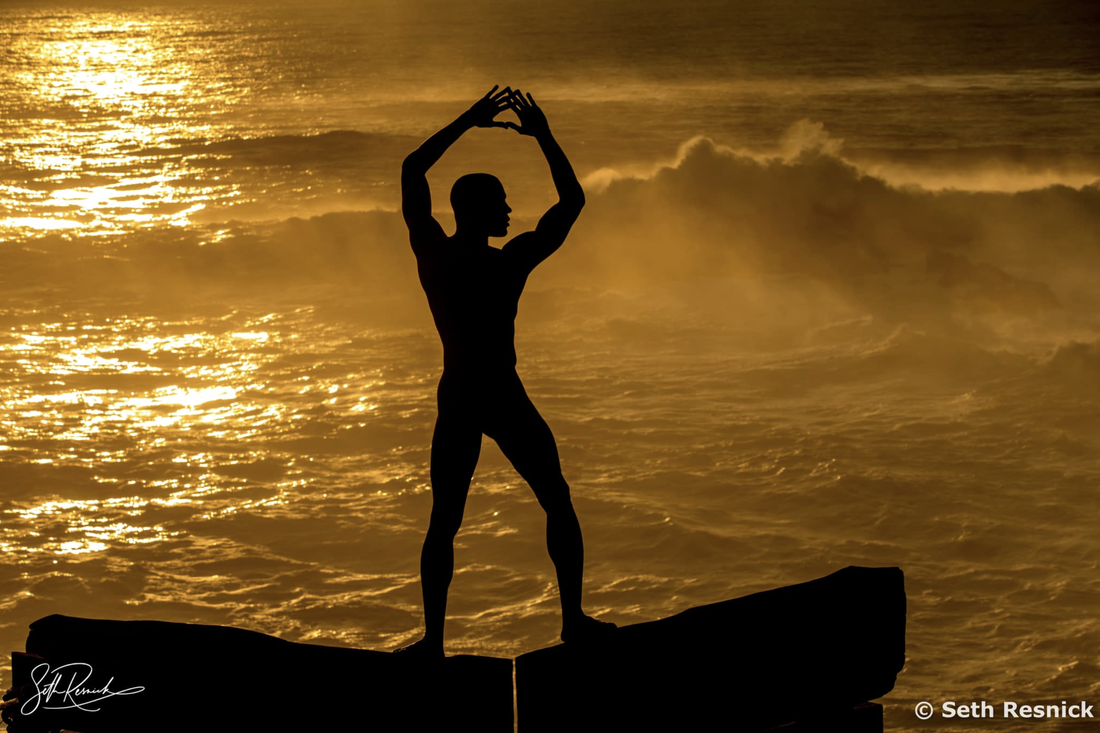 Intro by Skip Cohen It's Marketing Monday, and while this might seem a little off the topic, from my perspective, it's right on target. Anybody can market well enough to get their first client - the challenge is getting that client to keep coming back, as well as telling all their friends to check you out. That boils down to creating images that leave people in awe of your skills. Sure, it's about creating an experience and being fun to work with - but in the end, you have to create images beyond expectations. I've recently shared a few of Seth Resnick's posts from Facebook because he's writing outstanding content. He's posting information to make you a better artist, regardless of your specialty. I loved this post because it hits one aspect of adding POWER to an image. I've written a lot about your galleries as past Marketing Monday posts. Every image in your gallery should be a "Wow" photograph. It needs to be so powerful that you'd only need to show that one image to get hired, or have a picture editor want to look at more of your work. When was the last time you cleaned up your galleries? Is there work there that anybody's Uncle Harry could shoot? Are you sharing too many images and not showing your very best? Seth needs to be on your radar. He's regularly sharing great information covering a wide variety of topics on his Facebook page. And he's only a click away. by Seth Resnick
The silhouette from yesterday reminded me of the concept of balancing technical knowledge and aesthetics. There are photographers like the great “god” Jay Maisel who could care less about a lot of technicals and there are photographers who are so technical that they place the technical merits over the aesthetics. The answer for me is almost like a right brain, left brain combination or rather meshing together both aesthetics and technicals. All of this comes to mind as I think back to the days of Shadowland and the beginning of Lightroom. I remember some of the lead engineers thinking how to process a raw file and looking at all files as if they were the same only caring about technicals. Along comes my dear friend Greg Gorman and the engineers are blown away that the blacks in some of his images have no detail. They question whether this is correct and Greg explains how he intentionally slammed the blacks. For all the rules it is critical to understand that the first rule is that there are no rules that are always 100%. Crushing blacks is the process of taking relatively dark areas typically shadow areas and making them even darker by increasing contrast in those areas. It removes any areas of light within those dark areas. For photographers who grew up with darkrooms we talked about toes and shoulders where the highlights block off to white and the shadows block off to black on a given tonality curve so to speak. The toe would be the bottom part of any curve and the shoulder the top part. I remember discussing with the engineers what we were going to call curves in Lightroom. When we raised Toe, and Shoulder we got "huh" because while some of the engineers knew a ton about programing and pixels they weren’t necessarily photographers. In fact one camera manufacturer automatically did this intentionally in their processor because it minimized seeing noise in the shadows. I remember when I worked at the Syracuse Newspapers that we would have to fight like mad with the executive editors when we shot a silhouette because the art department was instructed to airbrush and open up shadows. The idea being quite literally that silhouettes don’t exist because shadows need detail. Anyhow, my point is silhouettes can make very powerful images and the crushed blacks do not need to be opened up……..  Intro by Skip Cohen The true power of the Internet, if you know where to look, is getting help when you need it. Last week I shared a Facebook post thanks to Seth Resnick. This morning, while running through my Facebook notifications, I caught this gem, again thanks to Seth. Seth needs to be on your radar. Click on the portrait below, which he shared with today's post. It will link you to his website. Bookmark his page and then stay on top of his workshop schedule. And if you're not following him on Facebook, here's the link. A quote on his website clearly describes Seth's passion for education: "Workshops Not PhotoTours." Whether you're interested in some of the most unique adventures around the globe or just boosting your skill set in Lightroom, I can promise you they'll be life-changing!  by Seth Resnick
I received a call from a very intelligent friend and he was desperate because when he opened up Lightroom, he had lost his pictures. Roughly a decade ago I did a video with Michael Reichman called "Where the #%*! Are My Pictures?” https://luminous-landscape.com/where-the-are-my-pictures/ Amazingly or not, I would say that 80% of the inquiries I still receive are people having this same issue. The main reason for this is that people really don’t understand what Lightroom is and that becomes the key to the problem. Lightroom is exactly like your local Public Library. Lightroom is the CARD CATALOG. If you don’t fully understand then read this over and over until you do. The card catalog has all the information about a book and it might even contain a thumbnail of the cover but there are NO BOOKS in the card catalog. The books are on the shelves on different floors and possibly even at a different branch. Lightroom is the card catalog and it contains all the information ie metadata about the images but it does not contain the images. The images or books if you will are on shelves or hard drives but not in Lightroom. There are some golden rules to adhere to in order to help eliminate this problem. 1) If you physically move the images outside of Lightroom, LR is going to lose them. Only move images within Lightroom. 2) If you rename the folder where your images are outside of Lightroom, LR is going to lose them. Only rename within Lightroom. 3) If you rename the images outside of Lightroom they will be lost. Only rename in Lightroom. 4) Make sure after you make changes to an image that you save the metadata Command S. If you don’t save the metadata and something happens to your catalog you will lose all the changes. 5) Use a dedicated drive for all of your images and your catalog. If you do this then if all else fails you still know where your images are and where your catalog is. 6) If you can’t find your catalog search for .lrcat I wrote 5 books on Lightroom so of course there is a lot more info than this but in the end most of the questions I still receive are solved by one of the 5 issues above. |


Our Partners


"Why?"Check out "Why?" one of the most popular features on the SCU Blog. It's a very simple concept - one image, one artist and one short sound bite. Each artist shares what makes the image one of their most favorite. We're over 100 artists featured since the project started. Click on the link above and you can scroll through all of the episodes to date.
Categories
All
|
 RSS Feed
© 2019 Skip Cohen University