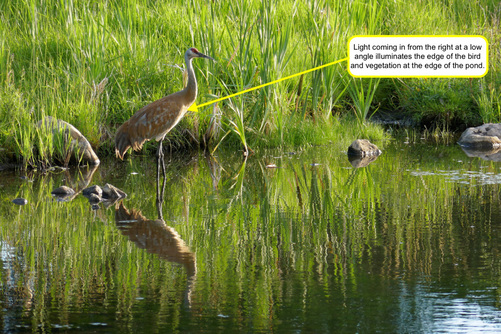
 Click to find out about the ZS100 Click to find out about the ZS100 Intro by Skip Cohen The fun of this industry has nothing to do with photography, but the friendships that come out of everyone's love for the craft. Daniel Cox and I met thanks to Panasonic. He's a Luminary, an artist, a writer, guide and educator. Spend just a few minutes with Daniel and no matter what the subject, if it's somehow related to imaging, you're going to learn something. He and Tanya spend a great deal of time on the road helping people experience one adventure after another, traveling all over the world. He's shared a number of posts here at SCU, but I thought it would be great to also share the short video above, which will give you a little more background. While his passion is wildlife photography, I'm not sure there's anything Daniel can't photograph. And, like the tours he and Tanya offer through their company Natural Exposures, he never compromises on the quality of any image. In this special guest post, Daniel shares some terrific advice, while shooting with a LUMIX ZS100. To get to know Daniel better, click on any image below to connect to his website. You'll also find more about Daniel and the other members of the Luminary team with a stop by Panasonic's LUMIX Lounge.  by Daniel J. Cox Camera: Lumix ZS100, Lens: 250mm, ISO 200 One of the most important elements in photography is light. It comes in many forms but what most are talking about when they discuss light relates to a strong directional light source in some form or another. As a wildlife photographer I often shoot in all kinds of light since animals and nature keep on living whether they’re in good light or not. Much of what I do is record their lives and what may be happening is often as important, possibly more, than whether the subject happens to be in a beautiful shaft of light or simply illuminated by natures soft box, overcast skies. Being a documentarian of the natural world is my first job but I’m always striving to shoot beautiful images as an artist as well. The absolute ultimate is when I get to combine art and nature together and I thought I would share with you a situation I recently captured first as a documentarian and then as an artist. The first thing I tell my students about light is this “forget the age old adage from the mid 1800’s where Kodak told all photographers to put the sun behind their back.” In those days that was necessary since film was rated at ISO 8 and lenses were no faster than F/8 or less. In other words you needed a lot of light, blasting directly on to your subject to get any image at all. Today we’re regularly shooting ISO 200, 400, 800 and even higher with optics of F/2.8 or wider. We have equipment with lots of ability to drink that light in, allowing us to shoot high enough shutter speeds that stop almost any action or camera movement. That being the case I suggest to all that will listen, “make sure you’re light is coming from 45 degrees either side or even directly behind your subject.” What I call side light and back light is the key to making a two dimensional object, which is a digital chip or piece of film, feel like it has three dimensions. Directional lightning gives the viewer the feeling of being able to wrap their fingers around the image, the ability to almost touch the subject on that two dimensional object which may be a computer screen or printed page. It’s the best way to turn a photograph in to a sculpture that has form and depth. The two photos I’ve included as examples show my subject, a sandhill crane, standing at the edge of a shallow pond. One image was shot while the sun was behind a very thick cloud, which as I mentioned above is like draping the sun with a great big soft box. It’s a great lighting technique for lots of subjects in the studio and it also works in nature. This image shows a serene scene of one of my favorite birds standing quietly, fishing. The second photo was shot after waiting for the very low, late evening sun to appear from behind a bank of thick clouds. When the sun dipped below the clouds it was blasting in from the right and it had that beautiful golden tone we all love. The closer the sun is to edge of the horizon, the warmer the color is we see due to what is known as scattering. Scattering happens when the evening light has to pass through thicker atmosphere or air which helps scatter molecules, the most easily scattered being violet and blue, away from our eyes. The longest wave lengths are warm in color such as orange and red and are more effective at cutting through the atmosphere without getting scattered. It’s the thick atmosphere the gives us the golden hour photographers so dearly love. Take the beautiful color of the Golden Hour and make sure it’s lighting your subject either directly from the right, left or behind and your image takes on the feeling of three dimensions. Images copyright Daniel J. Cox. All rights reserved.
0 Comments
Your comment will be posted after it is approved.
Leave a Reply. |
AuthorsWelcome to Luminary Corner. Besides being a recognized member of the professional photographic community, each post author is a member of Panasonic's LUMIX Luminary team. Archives
November 2017
|
© 2019 Skip Cohen University


