 Intro by Skip Cohen There are some exciting benchmarks in many photographer's careers. One of the first is getting an image published. Second is landing a cover shot. Third, is getting a book published. A big congrats to my buddy Rob Knight and Panasonic Luminary for his first LUMIX book. The book is available on amazon.com and wherever Peachpit Press books are sold. If you've got any questions, Rob does a great job of always being accessible. You can email him directly at [email protected] if you have any questions about the LUMIX GX7 or GM1. You'll find all of the members of the LUMIX Luminary team in the LUMIX Lounge, a great place to follow their infectious creativity! I am very proud to be the author of the first LUMIX book for Peachpit Press. My book is part of the “Snapshots to Great Shots” series, and it covers both the LUMIX GX7 and GM1 cameras. This is a great series of books that covers everything from landscapes to studio lighting. It may seem strange to include the GM1 in a book like this, but as you can see from shots like this, the GM1 captures stunning images for any size camera.  Writing the book was an opportunity for me to explore the functions of the GX7 and GM1 in a way that most photographers don’t have the time or inclination to do. I wanted to share two of my favorite tips from the book... Take Advantage of the Touchscreen There are more and more cameras using touchscreen LCDs. Some let you use the touchscreen to choose a focus point or fire the shutter, and others use onscreen buttons to augment the physical buttons and dials on the camera. Your GX7/GM1 uses the touch-sensitive LCD for all of that and more. The physical buttons on the GM1 are limited by its small size, but the touchscreen allows you to adjust your settings quickly and easily. Even with the excellent external controls on the GX7, the touch interface makes focusing, changing settings, and navigating the menus much quicker and easier than on a conventional control setup. Along with touch focus, I find that navigating the menus on the GX7/GM1 is one of the most useful functions of the touchscreen. Touching the menu items to change settings is much faster than using the cursor buttons to scroll through the menus. You must press the Menu/Set button to bring up the menu, but after that the touch interface is the way to go. 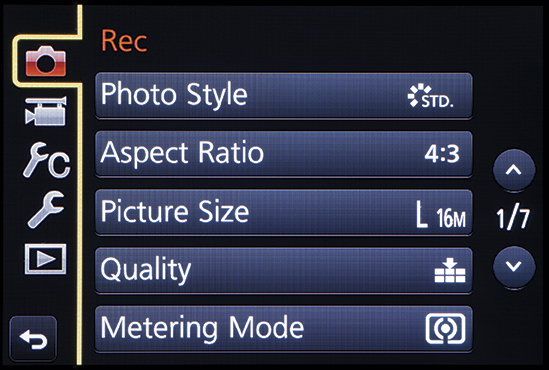
Flicker Decrease for Video It is common practice to set your shutter speed to twice the frame rate to replicate the characteristic look of a film movie camera. For 24p video, that means setting the shutter speed to 1/50 of a second for a smooth, cinematic look. You can set your shutter speed higher for a more staccato look (think Saving Private Ryan), or lower for more motion blur. Whatever shutter speed you choose, it is a good idea to use the same shutter speed for an entire project so that all the video clips have the same feel. You can use the Flicker Decrease function to control your shutter speed when you are not using Creative Video mode. Navigate to Flkr Decrease in the Motion Picture menu, and select a shutter speed that is twice the frame rate you are using. Now when you press the Motion Picture button you will know that your video will have a consistent shutter speed. 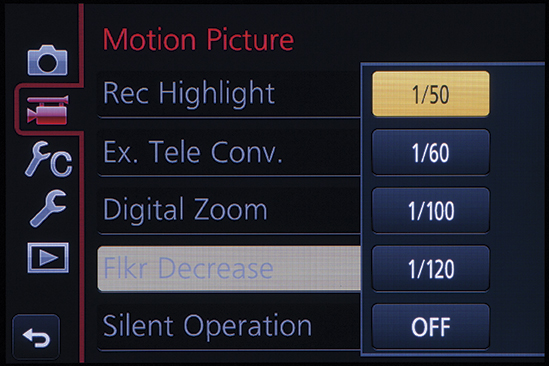 Image copyright Rob Knight. All rights reserved.
0 Comments
Intro by Skip Cohen For years I've said the best part of this industry has nothing to do with photography, but the friendships that come out of everyone's love for the craft. Well, my buddy William Innes is back with another Luminary Corner post and he makes a terrific point about trusting technology. William currently speaks on workflow and production matters, but rumors persist that there may be a travel photography related program in the works. To see more of William's wedding photography visit www.innesphotography.com and to see a slideshow of his photos from Morocco visit http://williaminnes.com/blog/morocco-2014/. You'll also find the latest from William and the other members of the LUMIX Luminary team in the LUMIX Lounge, a great place to follow their infectious creativity! 
by William Innes As a wedding photographer my camera remains in manual mode the whole day. I feel I need to control my exposure for consistency and the only successful method I have found is to set the f-stop, shutter speed and ISO myself. This is how I have shot for the last 8 years – no matter what the subject matter.  I recently returned for a short vacation to Morocco where this mindset of always shooting in manual took a turn for the better. I decided to travel light – two Panasonic Lumix bodies – the GX7 and small GM1. I accessorized these cameras with an assortment of Lumix lenses. The whole kit easily fit into the bottom of my regular backpack. I had been experimenting with the Ai mode (Automatic Intelligent Exposure) on these cameras and decided to give it a go while on vacation. The truth be told – I never took either camera off this setting the whole trip. I have found while traveling that it is easy to get caught up in trying to photograph your environment and really spending the day not experiencing the place and or culture. With the cameras set to Ai it was easy to spend a few seconds capturing the scene and moving on. My wife commented on how great this trip was and how we spent so much time enjoying the food, culture and people. The lesson here is to trust new technology in these cameras. It is crazy good. Think about what you are shooting and what is the best mode to use. One other technological advancement on these cameras I used – was the WiFi feature. Every evening I would use this feature to download images to my iPad and edit them using various apps – such as Snapseed. I then uploaded finished images to my Facebook page. 
Images copyright Willian Innes. All rights reserved.
Intro by Skip Cohen Bob Coates is no stranger to guest posts here at SCU. While he's pretty much shot with every type of professional camera in his career, he keeps finding some serious features in the LUMIX family that blend in perfectly with various challenges from different situations/conditions. And before you say, "Well, he's working for Panasonic as a Luminary," remember that Bob made the jump on his own and was shooting with the GH2 long before he ever met the LUMIX team. Here's a much earlier guest post. Interested in seeing more of Bob's work, check out his fine art site and follow his new blog. You'll never be disappointed. I was recently hired to help cover the Sedona International Film Festival for the organizers. One of the assignments was to grab some images from a live stage performance. There was some grief in the air from a previous performance being disrupted by flash being used and disturbing the audience. I assured the client that would never happen during my capture of a show. Using built in features of the Lumix cameras makes it possible to be extremely stealthy. I always work toward being low key in capturing images at events. I jumped up in the esteem of the President/Director of the Sedona Film Festival, because of a couple features on the Lumix GH3 and Lumix GX7. Here's the inside scoop. Feature one - Silent Mode. Being able to turn the camera to perfectly silent mode has been a feature I've always wanted to have and now it's available. I was standing right beside the guy who hired me capturing the scene. When we moved out to the lobby he asked when I was going to get the photos. I told him I already had and showed him some on the back of the camera. He said, "You are amazing! I didn't hear a thing!" 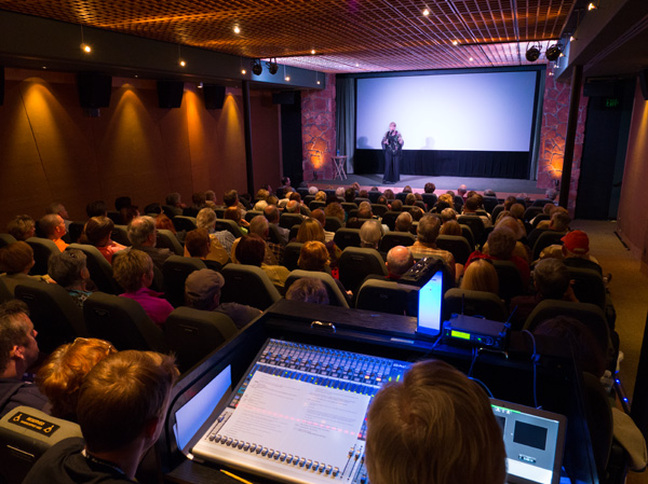
Feature two - Using the auto bracket on the cameras allows you to capture the large dynamic range of the scene by blending the various exposures together. You have the choice of three, five or seven image brackets in 1/3, 2/3 or full stops at the twist of a button or a quick visit to the menus depending on which camera you are using. 
Photographing on the go and making a white room with lots of lights look good takes a large dynamic range. This was accomplished by bracketing seven stops and then blending the images together in Adobe Photoshop essentially 'lighting' the scene with the software.
I keep finding more and more reasons to choose the Micro 4/3rds system and loving it! Intro by Skip Cohen Working with the Luminary team has brought a whole group of incredibly talented artists and educators into my life and in turn, into yours. This new guest post from Dave Surber is loaded with great content and tips for terrific street photography, but in all honesty, it's about being prepared for the "decisive moment" no matter what you're shooting. To see more of Dave's work take a look at his site, follow him on Twitter then Instagram and Google+. As with all the talent in this Luminary team, you'll never be disappointed! I LOVE SHOOTING STREET PHOTOGRAPHY- it’s one of my favorite things to do. Not only is it a great way to explore one’s surroundings, but it’s also a great way to keep the creative juices flowing. My real appreciation for street photography began when I took a course on the history of photography. During the course we studied the French photographer Henri Cartier-Bresson, whom many consider to be the father of street photography. In 1952, Cartier-Bresson published a book entitled “Images à la sauvette”- the English edition of this book was entitled “The Decisive Moment”. The book consisted of 126 pictures of his street photography along with a philosophical preface outlining his photographic style. At the core of Cartier-Bresson’s beliefs was the idea of the decisive moment. In a nutshell, Cartier-Bresson believed that a street photographer only has a split-second to capture a magical moment in time. He entitled that split-second the decisive moment. For example, let’s look at one of Cartier-Bresson’s most iconic images taken in Hyères in 1932: 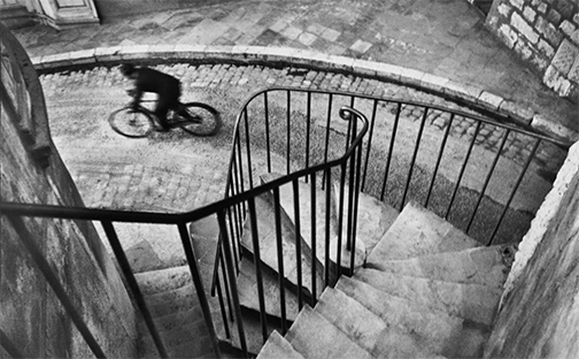 Henri Cartier-Bresson, Hyères, 1932 For Cartier-Bresson the decisive moment of this picture is the split second he had to capture the bicyclist in that exact location as it relates to the curve of the street and the shape of the railing. Upon examination you will see that the shapes and lines within this photo form a “golden ratio” composition: 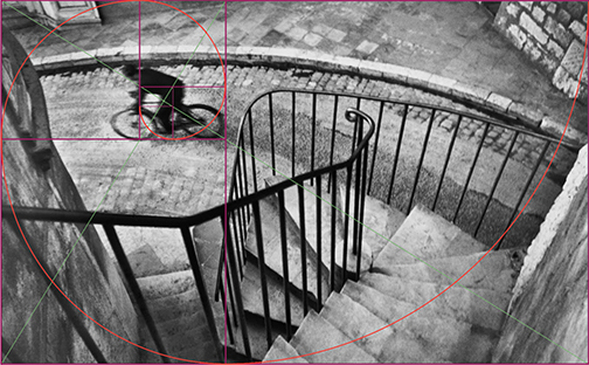 Henri Cartier-Bresson, Hyères, 1932 with Golden Ratio overlay Hence, through the use of the decisive moment, Cartier-Bresson was able to transform this seemingly mundane picture into a greater work of art. In order to capture this fleeting moment both Cartier-Bresson and his camera had to be completely prepared and ready at a second's notice. Which brings us to some street photography and camera setting tips for capturing the decisive moment: 1. Always bring a camera with you!
2. Go for the candid shots.
3. Be hyper aware of your surroundings.
4. Tell a story!
Make sure your camera is always ready!
While out and about, keep your camera on and your lens cap off.
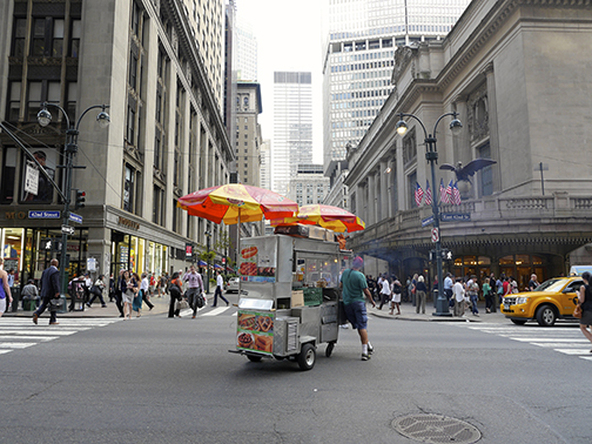 Dave Surber, Food Cart, 2013. Picture taken with Panasonic Lumix DMC-GH3. 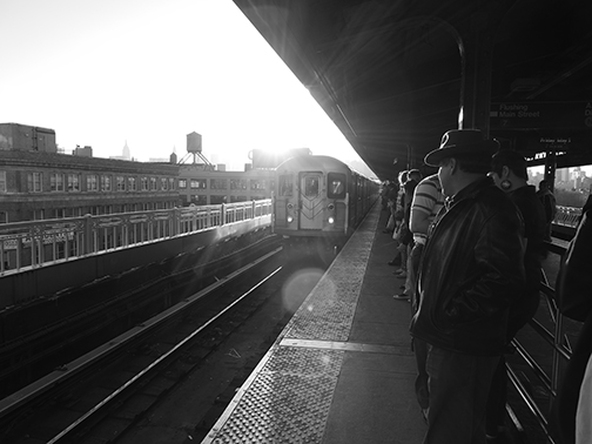 Dave Surber, Waiting for The 7 Train, 2013. Picture taken with Panasonic Lumix DMC-GH3. While writing this blog post I found this great short film on YouTube entitled, Henri Cartier-Bresson: The Decisive Moment”. Cartier-Bresson narrates it. So, if you want to learn more about Cartier-Bresson from the man himself, here’s your chance. Enjoy! So there you have it, some tips and tricks to help you catch the decisive moment. I hope you’ve enjoyed the post! And please, if you have any tips and trick you’d like to share with us please do so! As always, comments and feedback are appreciated. Happy shooting!
And to all those Lumix Intagram shooters out there, don't forget to hashtag your pics with #LumixLounge to be a part the Lumix Community Gallery. Intro by Skip Cohen So often we see a photographer promoting a particular product and think we're only hearing about it because that's their job. Well, if you're one of those people who spends time being skeptical, read what Rick Gerrity has to say about Panasonic's LUMIX family in an email he sent me below. Rick has been a published, professional photographer based in the NY/NJ metro area for over 25 years. A quote on his site pretty much describes his work in just one sentence: "I specialize in people, product, location and subculture photography throughout the US and Canada and I have a passion for transforming seemingly ordinary, everyday moments into extraordinary images." What a kick to be able to work with Rick and the Luminaries and keep sharing some outstanding work. Interested in seeing more of his work - check out his website. Skip, I started using Lumix cameras before mirrorless when the 4/3rd's system was first announced. So when the Lumix G1 was introduced as mirrorless I jumped in, long before the Lumix Luminary program. 
Oliver Stone

Baz Luhrmann
I use the Lumix G series cameras because they work for all my specific needs, such as low light and slow hand held shutter speeds. Oliver Stone and Baz Lurman were photographed on the G1! For those who think I use Lumix G series cameras because I get paid to do so are very wrong. The link to the biker blog I sent in the previous email was from 2011 and all shot on the GH2. The small size and fast glass allows me to carry lots of lenses, spare bodies, video rigs and a boom mic. My Biker photos attached are all made on the GH3 and GX7 available light. I love what I do and I will keep moving forward with all the new technology that LUMIX can produce. The small high quality G Series cameras are also a great conversation piece and icebreaker.People always ask what kind of camera is that? Lots of my Biker friends are very interested in photography and the small size allows them to fit in the saddle bags on the bikes. 


All images copyright Rick Gerrity. All rights reserved.
|
© 2019 Skip Cohen University