|
Intro by Skip Cohen Right off the bat somebody is going to take off my head and claim this is simply too basic for the professional community that makes up the majority of SCU's readership, but there are two things I love about this post. First, it's a great reminder of a series of simple rules at getting better indoor images through the holiday season and sorry, there are a few of you out there who could use a refresher course. Second, I love the way Rob has explained the process. It's perfect for his own blog to serious hobbyists and even better for many of you who won't have the time to explain to your teenager or an elderly family member how to beef up the quality of their photographs. In college I took a speech class once and the hardest assignment was telling somebody how to put on a coat assuming they didn't know what a coat was, what sleeves were or which was the top or the bottom. There are times when photography isn't much different - as professional photographers you do things so instinctively that you don't do a very good job when it comes to explaining the process. A big thanks to Rob for today's Luminary Corner post and to what's become all of our favorite camera gear, the LUMIX system. Check out more of Rob's terrific advice on his blog, visit his website and if you're looking for a unique trip at an even more unique price, check out Rob's adventure to Costs Rica! Follow him on Facebook and Google+ too. It’s that time of year again! The time of year when (if you’re not already) you become the family photographer. You have the best camera in the family and all those fancy lenses, so you’re expected to capture all of the great moments in all their glory. Many photographers feel anxiety during the holidays because they will be shooting indoors. You can crank up your ISO and use the fastest lens you have, but at the end of the day a little flash can make a big difference. Even if you keep the flash on the camera you can make some great holiday photos. Here are a few tips to take the fear out of making your own light. 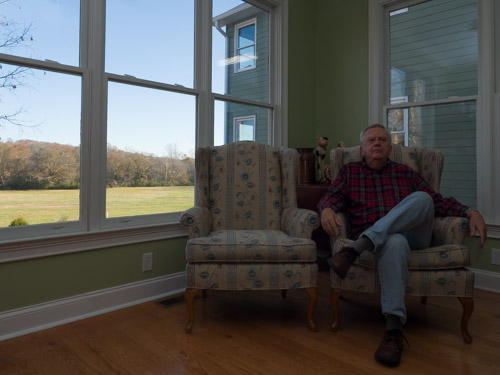
Manual exposure for the ambient light without the flash
Shoot in manual exposure mode. Generally we want to add flash to the existing ambient light in a natural way. Set the exposure in your camera so that the ambient light is under control so you can add flash to your taste. If you let the camera pick the exposure it will make different decisions based on the background of your subjects. Start by setting the ISO around 400 and set the shutter speed to your camera’s x-sync speed. Depending on the camera this is usually 1/160-1/250 sec. This is the fastest shutter speed you can sync with your flash, and it will give you the best chance of freezing the action of all of the holiday excitement. Next, set your aperture value so the ambient light is underexposed by 1 stop. This will help your subject pop against the background when you add the flash. If you can’t get the exposure you want with your maximum aperture, try raising the ISO to get the exposure you want. Most cameras these days make great photos up to ISO 800 and beyond. Let your flash help you. When I’m shooting a family event I generally have the flash on my camera’s hot-shoe and set to TTL auto. This allows the camera and the flash to have a conversation and adjust the flash power depending on the ambient light and the distance to the subject. You can adjust the power of the flash to your taste, and the flash will add your adjustment automatically as the shooting situation changes. Bounce your flash. One of the advantages of shooting a family event indoors is that there is usually a white ceiling a few feet overhead. This gives you a great tool for bouncing your flash. When you point your flash at the ceiling and bounce the light toward your subject you effectively increase the size of your hot-shoe flash. This larger light source is softer and generally prettier than blasting someone in the face with direct flash. Use a bounce card. Many speed lights these days have a built-in bounce card. It’s that little white plastic card that slides out from behind the light. If your flash doesn’t have a built-in card, simply use a rubber band to hold a small card behind the flash head. This little bounce card reflects a bit of light toward your subject to fill in the shadows when you are bouncing the flash off of the ceiling. This can help reduce harsh shadows and brighten your subject’s eyes. Think about white balance. Your hot-shoe flash is daylight balanced. If you’re shooting indoors with a lot of window light, the color of your flash will probably match the ambient light just fine. If you’re shooting indoors with mostly lamp light or other artificial light you can change the color of your flash to match the ambient light. To change the color of your flash you use small pieces of thin plastic film called gels. I recommend one of the gel kits you can buy because they are inexpensive and will give you lots of options. I usually find that a 1/4 or 1/2 CTO (color temperature orange) gel works perfectly in most household situations. You can either use gaffer’s tape to attach the gels or use one of the fancy velcro sets that’s available. 
Same exposure value with the on-camera flash added and bounced off of the ceiling

Since the exposure is set manually the value won’t change whether I'm shooting two people...

…or a small group
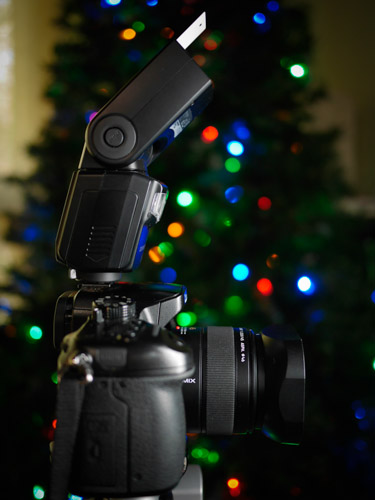
I usually use a 45 degree angle when bouncing the flash
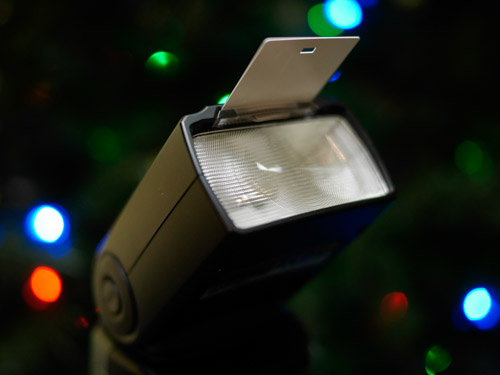
Use the built-in bounce card or add your own with a rubber band and a business card
Get some practice. Many of us will be attending holiday parties and a family member’s house that we visit regularly. If you will be visiting Grandma’s house before the holidays, bring your camera and flash and practice setting the exposure and adjusting the flash. All the better if you can visit the site of the festivities at the same time of day you will be shooting the holiday party. You might even want to make notes of your exposure values and flash settings. The last piece of advice I’d like to offer is not to stress out over your holiday photos. If you’re not getting the great photos you want, switch the camera to auto and don’t sweat it. It’s great to have beautiful holiday photos, but not at the expense of your enjoyment of the festivities. Try setting up a “studio” at the party where you know you can get a great shot and ask everyone to pose for you. That way you get some great shots without stressing out over your lighting and exposure all day. Don’t forget to have fun and enjoy the party.
3 Comments
marianne h
12/25/2013 03:14:25 pm
hi-i needed you on the 24th for your flash tips-at lias@carlos party--fabulas -yes thats the other guests name0is a yes -nikon usesr-so-maybe after reading u tips i be the wiser---got to show u one in an email and u will get me 1 tips how to have it done better rob ok -tx for sharing all u skill with me over the past month rob-love our knapsack the wireless-the new 20mm-marianne h-how many seconds is the delay on my flash=we had a few misses there too-shadows do bother me the most-how to avoid it rob- 1/4/2014 09:46:49 pm
Hi Greg, Your comment will be posted after it is approved.
Leave a Reply. |
© 2019 Skip Cohen University