|
Intro by Skip Cohen I've worked with the Photodex team for close to ten years. One constant has always been their focus on education and helping photographers raise the bar. This post about slide shows is from their archives, posted by "Amanda" almost a year ago. I wanted to share it here, because e-hybrid solutions are changing the way photographers market themselves along with the products and services they offer. In fact, if you haven't seen it yet, check out the winner of our first "Ultimate Story Contest". It's an outstanding example of great story telling combining video and still images. A new contest is about to be announced next week and like this first one the winner will receive a Panasonic LUMIX GH3, a $500 gift certificate for any Profoto products, X-Rite's Colormunki Photo and a year subscription to Pro Show Web Premium. Plus, the winning video for each contest will be published on the Resource Magazine website. In the mean time, video is opening new doors for you as an artist and Photodex is in the lead helping you make the most of this expansion of your skill set! Video slideshows are an excellent way to promote your photography, share your work, get referrals and make more money. See the top 5 ways photographers use ProShow video slideshows to grow their business. 1. Use a Video Slideshow as an Upgrade Incentive Include a video slideshow in one of your higher-end packages to entice clients to purchase a larger order. Try delivering your slideshow in a custom folio or personalized USB drive to really amp-up the value. Polished packaging is key! 2. Proofing With Slideshows Whether you invite clients into your studio to watch a slideshow of their images for the first time, or you send a digital proof for clients to watch in the comfort of their home, one thing remains the same – clients are usually so emotionally moved when they view their images in a moving video slideshow set the the right music, they are often brought to tears…in a good way! Tap into that emotion and lead a proofing and sales session with a slideshow viewing. 3. New Client Referrals with Social Media Post your video slideshows to Facebook, YouTube, Twitter and Pinterest with relevant keywords and always link back to your site. Tag your clients in your video slideshows on Facebook so their friends and family see the posts too. The more you post, tag and promote, the more potential clients will see your work. Videos are shared 12X more than links and text posts on Facebook alone. 4. Blogging With Slideshows Video slideshows add an interactive element to your blog posts. Try embedding a client’s video directly in your next blog post. It’s likely to be shared, liked and viewed more than just still images alone. In fact, online retailers have found that customers are 85% more likely to purchase a product after seeing it featured in a video. Think about what this can do for your sales! 5. Sell Video Slideshows Directly to Clients Designed by Print for Love of Wood.
Add to your bottom line and sell the slideshows you make in ProShow directly to your clients, in the form of a DVD, Blu-ray disc, HD digital download or deliver a video on a custom USB drive. Once you make a slideshow with ProShow Gold, Producer or ProShow Web, it’s yours to share, distribute or sell however you see fit. ProShow Web users, simply make sure you’re signed up for a Premium account and you’re good to resell too! Wedding and portrait clients are great candidates to sell video slideshows to and often seek video slideshow services as part of a photography package.
0 Comments
Intro by Skip Cohen Here's a great example of the fun of "networking". I was at ShutterFest last April. I got downstairs early one morning and just started talking to one of the photographers, Gary Altman. We probably talked for an hour or so, nothing earth-shaking, but the start of a great friendship. I'm always looking for photographers with something to say and Gary offered to do a guest post. He sent me today's post and I loved it...a totally different approach to a new topic and presented with the seriousness it deserves, while still having a little trademark "Altman sarcasm". So, meet my buddy Gary Altman. He's a photographer from South Carolina, with his primary focus on seniors and weddings! There seems to be an issue lately surrounding shooting on train tracks. From a professional photographer's point of view, it's come up in several forums. The conversations seemed to have started when a photographer was struck and killed by a train very recently.
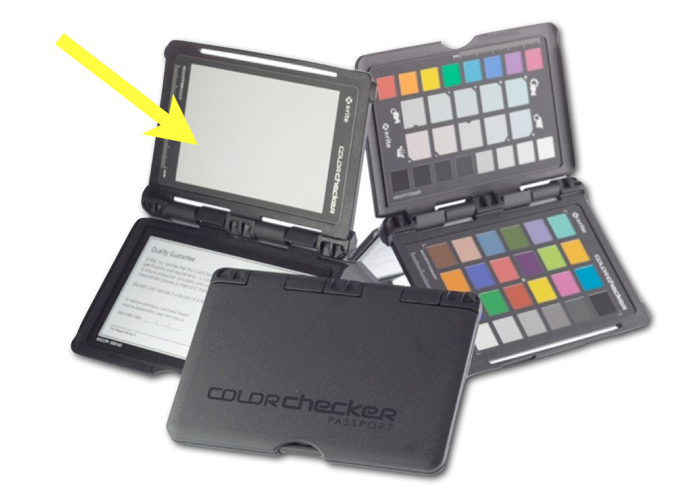
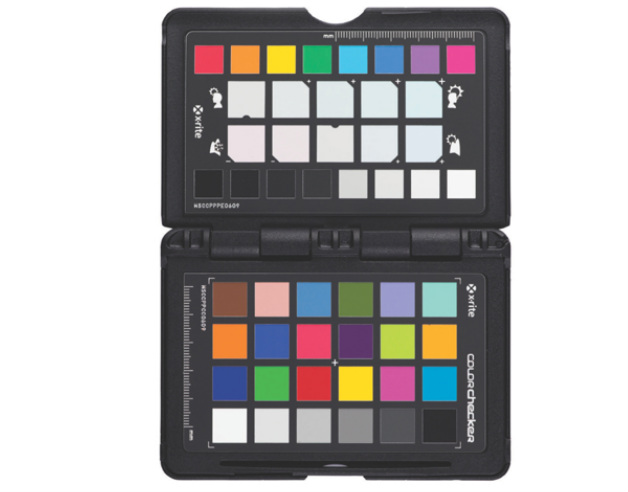
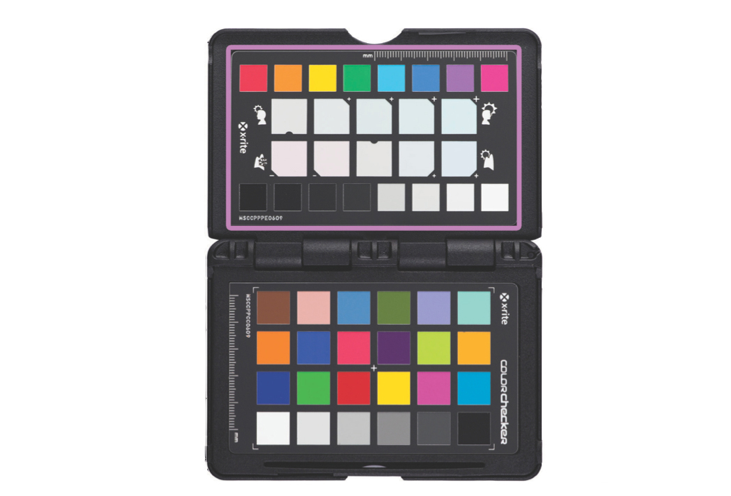
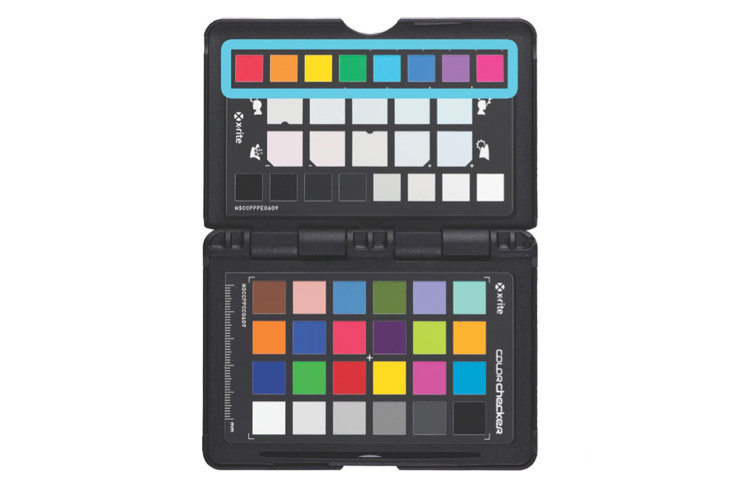
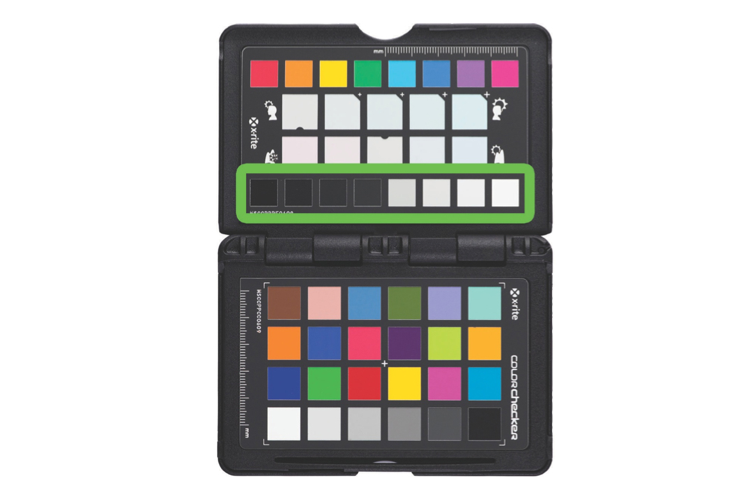
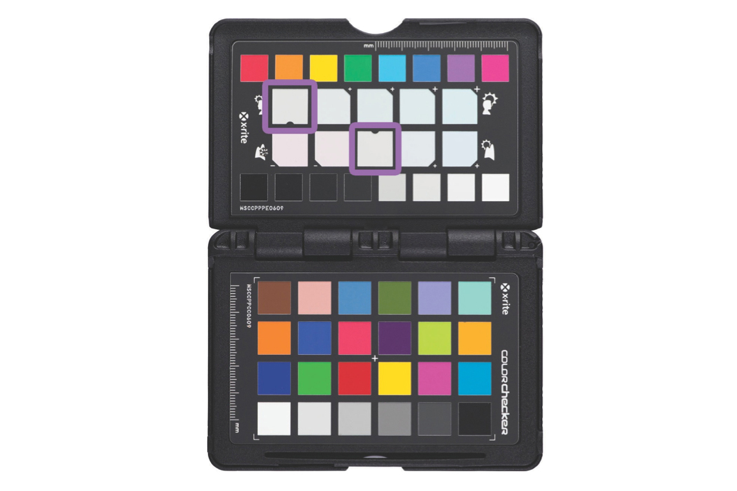
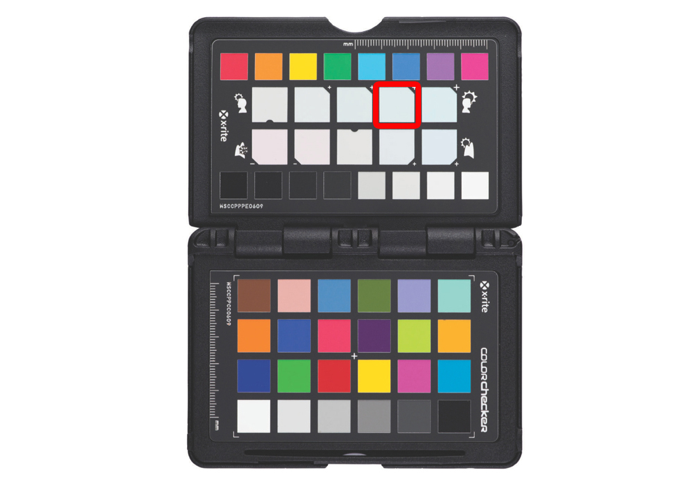
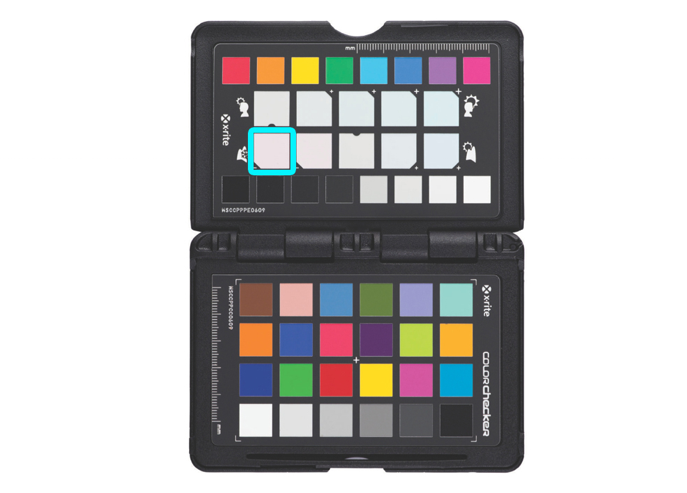
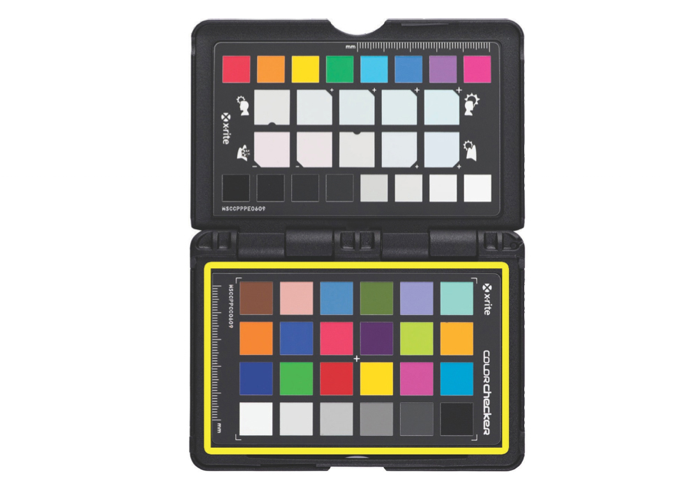
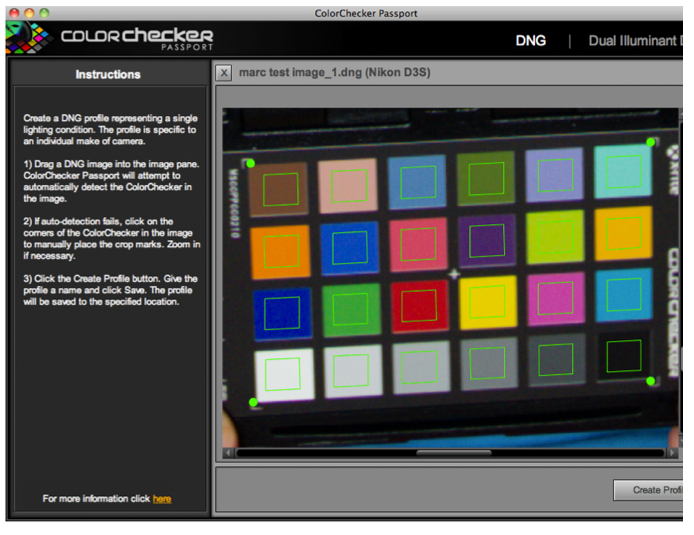
For me, I grew up around trains and because of that, I don't have the overwhelming desire to shoot on the tracks. But I'd be lying if I said I wasn't intrigued when I drive over a crossing. Regardless, here are some legal issues to keep in mind if you decide to shoot on those tracks: First, it's illegal in some way, shape or form. If there are no signs or fences, it's a violation and you're subject to a ticket (more likely) or arrest (less likely) as tickets are used in lieu of an arrest situation. However, if there are signs or a fence and you get caught on them, it's a misdemeanor and you will be arrested. I shoot primarily high school seniors, and I'm kind of thinking it would be REAL BAD for business if I or even worse, they got arrested. So for the professional photographers among us, this is for you... Probably more important then being arrested is your exposure to liability. #1 - If you don't have adequate insurance you might want to figure out how you're going to pay the hefty lawsuit and the attorney's fees when you're found negligent. #2 - If you were smart enough to have purchased liability insurance, chances are it will not cover you for ANYTHING when you do something illegal. So, go back and read #1 again. Now, if you're STILL determined to shoot on the tracks continue reading.... If you're smart enough to know you're stupid, don't shoot on the train tracks. If you're the type of person who, when they shoot they zone out and don't see, hear or smell anything around them, (also called "Being In The Zone"), don't shoot on the tracks. Stay away from the 3rd rail. If you don't know what the 3rd rail is, don't shoot on the tracks. Usually the third rail is covered by a wood plank. The 3rd rail carries over 600 volts of DC power. This is different from the current in your house. How so? Well...if you stick a hanger in your wall outlet it will blow you back and away from the outlet. DC current sucks you in and doesn't let you go until you are fully electrocuted....cooked to well done! Now let's remember what runs on the tracks - TRAINS! They're no joke. They stand about 14-16' high (wheels to roof), and I've seen many victims who have gotten hit by trains. Trains are intimidating in size, especially when not on a platform and being that close to them. If you easily become mesmerized and lose your bearings on where you are, don't shoot on the tracks. Give yourself PLENTY of room to VISUALLY see anything that might be coming your way. You're shooting your model...you look behind her and she looks behind you. You want to have enough time to pick up a light stand, gently grab her hand and escort her off the tracks by walking with enough time to finish a cigarette, BEFORE the train gets to your position. Even if that curve in the tracks is an aesthetically better visual location to photograph, it's also a better location to get you or your subject killed. So, if you don't have a clear line of sight to safely vacate, don't shoot on the tracks. DO NOT SHOOT INSIDE A TUNNEL. It is impossible to tell from where the train is coming from. The sound is a rumble and the acoustics in the tunnel bounce the sound in every direction. Look BOTH ways before approaching any train tracks. Yup...both ways. You just don't know if they're doing maintenance work 20 or 200 miles away and re-route a train onto a track and suddenly it's coming from the wrong direction. Know your train schedules. Where I am now, there is a freight train that goes by at 1:00 am every day. You shouldn't rely on that solely, but say you're shooting there at night and it's 12:55am. That would be a good time to take a break, have another cigarette and have your model do a wardrobe change. And if you don't smoke, then chew a piece of gum as your timing mechanism! LOL Now if you still feel you MUST Shoot on train tracks, get permission from whoever runs them. Go to a museum. Find tracks no longer in operation. Composite them from other stock images. Just in case you're questioning my background in spending so much time talking about trains... In a previous life, I was in law enforcement. I grew up around train tracks, hanging out within 10' of express trains going by! I was track certified by the NYC Transit Authority while working in NYC, as well as taking a law enforcement track search training. As an artist I recognize the aesthetic lines adding impact to your images, but even more important is the impact they can have on changing your life...and not in a good way. Be safe and if you missed my point, don't shoot on the tracks! Intro by Skip Cohen We don't do a lot of "how to" photography posts on the SCU site, because the focus is typically on marketing and business. However, every now and then something really terrific comes along that's relevant to some aspect of your work. In this case, it's the presentation quality of your images. This post from Jeff Lazell at X-Rite has so much great information in it. Showing your images with all the quality they're meant to have is critical to your success as an artist. Jeff does an outstanding job of taking through all the features of the X-Rite Color Checker Passport and a better understanding the significance it plays in color calibration. One of his last sentences says it all and hits on the issue to stop eyeballing color calibration and do it right... Learn how you can stop guessing and start knowing with color management solutions from X-"Rite!" 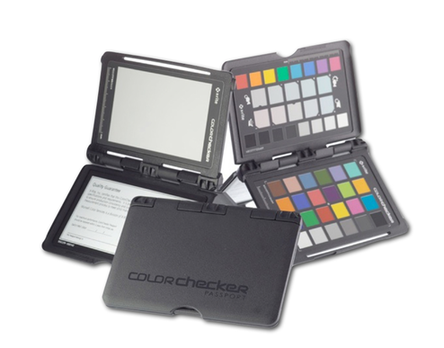 by Jeff Lazell Whether you work in the photo industry, or pursue photography as a passion or hobby hopefully you have come across one of my favorite color management tools at least once. The X-Rrite ColorChecker Passport. Now, I am sure that many if not most of the readers of this blog are familiar with what all these little squares of color are and what they do, but today I thought I’d go over the whole thing from top to bottom in hopes of clearing up any confusion and to provide a resource for those just dipping their toes into the world of color management on the camera level. The ColorChecker Passport is very simply put a set of calibration cards for you to include in test shots while shooting. Not unlike a photographer’s gray card. In fact it does include a gray card in the set. This can be used to set a custom in camera white balance while shooting. Of course the procedure for this is going to be different from camera to camera, so its best to just check your manual for instructions on how to do that for your own camera. But in general the process usually involves taking a photo in the light you are looking to calibrate for filling the frame with the grey card and then following the steps in the camera’s menu to set the white balance. Now let’s move on to the two more colorful cards. The way to use these cards is very simple. For every lighting situation you encounter take a test shot including these two cards. So, if you are shooting in a room lit by tungsten lights include the ColorChecker in the first shot and then continue shooting as you would. Then if along the course of the shoot you move locations, say go outdoors, take another test shot with the checker because the light has cahnged. One test shot for each lighting condition. Also, if you for some reason switch cameras, take a new test shot. Please note though, for the ColorChecker to be fully effective you must be capturing in RAW. You will still of course get some benefits from the ColorChecker if you are capturing in jpeg, but because of the nature of the file a lot of the color information we want to work with is lost in the the compression. Once you have finished shooting and have moved on to the processing stage you will begin to see just how powerful a tool the ColorChecker Passport is and how easy it is to integrate into your workflow. The top card is referred to as a creative custom white balancing tool You can use this in any software that allows you to set a white balance by using a dropper tool. But first up top here we have a set of color patches. These are mostly for reference. Like if you had a very specific red you needed to reproduce, this is most useful for things like product photography On the bottom there is also another set of patches for checking your shadow and highlight details. If you set exposure warnings or “blinkies” on your camera or software this can be a very quick reference. In the middle are the gray patches for setting your white balance using a dropper tool. Both of the highlighted ones above with little bumps in their frame are neutral gray. Clicking there will immediately neutralize your white balance. First and foremost this is intended to be a time saver. No more clicking and hunting trying to find something white in a scene to set the white balance from. And now you can click with confidence, because you know that these patches are and always will be neutral. Every time. The unfortunate truth of using a dropper to set a custom white balance is I think it leads people to belive you have to set the white balance off of something white in a scene. This is actually large problem because it is very rare to encounter things that are actually “pure white” in the world. So, when you set your white balance by clicking on something that isn’t truly neutral you are in a sense stumbling right out of the gate color wise and now that little variance is going to follow you through out the rest of your workflow. Always having a good bit of neutral grey with you makes sure that does not happen. Now what are these other gray patches for then? They are for tweaking your white balance, quickly without having to mess with sliders or anything like that. So, say you shot someone and they ended up looking a little pale when you neutralized the white balance? You can just move your dropper tool up to one of the warming grays and there you go. Conversely if you had a scene you wanted to cool down some, you can just move your dropper down to one of the cooling grays. Again this is all about speeding up the color correction process, it gets you to the fun part of editing sooner. It also adds consistency to your edits, no more vaguely moving sliders until it looks right and because we are working with constants, this step is always repeatable. Last of course we have the color checker itself. Now, this is a collection of very specific colors that work with the included software and a Adobe Lightroom plug-in to make a custom DNG profile for you specific camera. It is important to remember at this step that setting a white balance is not color calibration. You can have the white balance perfectly set and your camera could still not be correctly rendering certain colors. In fact you could take 3 brand new, identical cameras off the assembly line and they would all be slightly different color wise. This step of the process will correct for that. X-Rite’s stand alone software and Lightroom plug-in uses the colors in this card to run a test on your specific sensor, in your specific camera, in that specific lighting condition. The result is a non-destructive DNG profile that you can then apply to all the files you captured with that camera in said lighting condition. Basically what these profiles do is correct for where your camera’s version of color varies for whatever reason from ICC standards. An added benefit of this is that since you are calibrating to a standard, you can use this method to calibrate multiple cameras to the same standard. Which is to say if you shoot with multiple camera bodies or with other photographers you can now make those cameras all match color wise by making and applying DNG profiles. Also, the more you use the ColorChecker you will begin to amass a library of profiles specifically tailored to your gear, which will again get you through the editing process faster and more accurately. Combining the use of a ColorChecker Passport with a properly calibrated monitor will go a long way to solving whatever color issues you may have and give you the confidence to know that you are getting true, consistent color every time you shoot. Adding it to your workflow is not only going to save you time, but it also the color headaches that sometimes come with digital photography. I hope this little run though helped, if there are any more questions be sure to leave them in the comments or check out our webinar archive here.  Learn how you can stop guessing and start knowing with color management solutions from X-Rite at www.xritephoto.com. Get the latest news, special offers, webinar notifications and much more by reading the X-Rite Photo Blog and following @xritephoto on Twitter, “Like” X-Rite Photo on Facebook. Now check us out on Google +. Start saving time and money with color management solutions from X-Rite. Visit www.xritephoto.com for information on all color management solutions for video and still photography. Intro by Skip Cohen Those of you who know me well, know what a fan I am of sarcasm, which is a big part of what started the friendship with Michael Novo. While he definitely walks a thin line, at times sounding like he's insulting all of us, he also recognizes that he's a long way from getting his own skill set where he wants it to be. In fact, that might be why I see him at so many workshops. You might even say he's working hard to get his work to a level that people want to steal his images! If you start to feel a little dumped on, read the whole post...he really redeems himself in the last few paragraphs. Most important of all is one point he left out that I've believed in for years...make sure you're paid fairly up front, so you don't care quite so much about what happens to your images after they've been delivered to the client. We’ve all heard the debate about securing your images online with the use of watermarks. To mark or not to mark, that is the question. That horse has been beaten to death so much, that it’s on the verge of coming back as a zombie horse.
On one hand watermarks are a pretty decent deterrent against someone looking to snatch your photos. On the other hand, they are of course ugly and intrusive. In fact the more creative someone gets with their watermark e.g. butterfly kisses, hearts or some other travesty that the photographer finds cute, the uglier the watermark usually is. So it really boils down to which route is best. Do I watermark, do I output low resolution files or should I even go as far as avoiding online posting completely? The solution is actually simpler than you may think and avoids watermarks altogether. It’s time tested and has a success rate which is very close to 100%. You retain the ability to share your images online with the entire world and not worry about theft. In fact the system is so effective that even high resolution digitals are safe and sound! So what is this new and innovative solution? Here it is… Your images aren’t very good and no one wants to waste their time to right click and save your mediocre photo. They especially don’t want to market their company with your images either, unless of course they’re trying to go out of business. “Is that really the solution? Did this jerk just insult my…?” Yes…you’re welcome. You may now continue your digital life totally watermark free. No, but seriously, your images really aren’t that amazing and there’s really no one out there who wants them in the first place aside from the client. If you have ever asked for critique of an image and one of the phrases you heard was “Well…I like the idea behind this image”, then congratulations sir or madam, your image was just stamped as being secure from theft. There’s no one at Getty who descended upon your portfolio and said “I must have this amazingly so-so image from that photo walk this photographer was a part of.” There’s no executive at Nike who saw you posting an image of your kid playing sports and thought “AH-HA! With no watermark on this image, now is my chance to strike!” I know what you’re thinking right about now. You’re thinking “Well ‘F’ you Michael Novo, your images aren’t anything special either!” And I would have to agree with you there, which is why I don’t watermark mine either. I can compromise and say that when tagging a client on social media, it can be a possible way to drive folks to your site but even that idea is being phased out. When someone wants to find you, they will. But every point has a counterpoint. Not long ago Sal Cincotta came across a photographer who not only stole his work, but built a good portion of his website using Sal’s images. Jerry Ghionis recently had one of his images published as an actual marketing and advertising campaign by another photographer. In fact there are many well-known photographers in the industry whose images are stolen on a regular basis. But the difference is that their images are worth stealing while many of ours aren’t (at least not yet). It’s an odd measure of security but what the majority of the photographic community has, is called ‘Security by Obscurity’. The evil-doers either don’t know about you, or if they do know then they don’t care because they would rather steal from the very best than from the middle of the road. But even the very best of the best often skip the watermark. I reached out and asked Jerry and Melissa Ghionis about why they choose to not watermark their images knowing full well that there’s a very good chance that their images will be used by others again. Melissa told me: “Our basic reasoning behind it is that our images look prettier without a watermark and a lot of watermarks can actually be quite distracting.” Jerry also added “The money that I will make with my images showing beautifully, with no distraction will far outweigh the money that I might lose from people copying my images. If someone is prepared to go to the extent of stealing my images then they could easily crop an image closer or remove a watermark in Photoshop. Thankfully, because of my profile and friends around the world, when someone does steal an image from me they seem to be found out pretty quickly.” If what you are creating is art, then let the art speak for itself. Instead of worrying about ‘protection,’ focus on putting your heart and soul into your craft so that what you create stands out from the crowd. Make something that is actually worth stealing (ideally licensing). Get out there and capture a landscape image…a wedding moment…or a portrait which remains in a person’s mind long after they first saw it. Create something that an individual will look at and say “I want that image to be a part of my life.” When you capture and create something beautiful for the world, you have a much better chance of something beautiful being given back to you. So get out there, get creative and leave the watermark button unchecked. |
Archives
November 2016
|
© 2019 Skip Cohen University





 RSS Feed